
Steris Amsco V116 Operation Guide
At Sterilizer Autoclave Solutions, we make it our job to provide you with the proper knowledge to make sure everything goes smoothly for every phase of the process when it comes to your autoclave. From installation, to operation and even maintenance. But some autoclaves are built a bit differently, like the Steris Amsco V116 freestanding autoclave. As a freestanding autoclave, it has a pretty high maintenance existence that requires installation and maintenance to be handled by a trained profesional. But when it comes to the end user, there’s always something new to learn, like how to operate your Amsco V116.
In this article, we’d like to focus on the operation guide for the Steris Amsco V116. We’ll use the operation instructions provided by the manufacturer, Steris. With proper operation, you can ensure that your sterilization cycles are completed to standard, and your autoclave doesn’t run into issues along the way.
We’ve written an article about the Steris Amsco V116 with more info on our site here. If you have any questions about the Steris Amsco V116 or anything else, please give us a call at 704-966-1650 Option 3 for our Free Tech Support line.
Before Operating Sterilizer
Warning
BURN HAZARD
Warning
SLIPPING HAZARD
To prevent falls keep floors dry by immediately wiping up any spilled liquids or condensation in sterilizer loading or unloading area.
Operate sterilizer by referring to the appropriate cycle descriptions in this section. The steps described on the next three pages are general instructions that apply to all cycle operations.
1. Press ON touch screen pad on sterilizer control display.
Printer records time and date the power is turned ON.
2. Open chamber door.
a. Verify drain strainer is clean and in place and chamber interior is clean. Refer to Routine Maintenance Manual if cleaning is necessary.
b. Close chamber door.
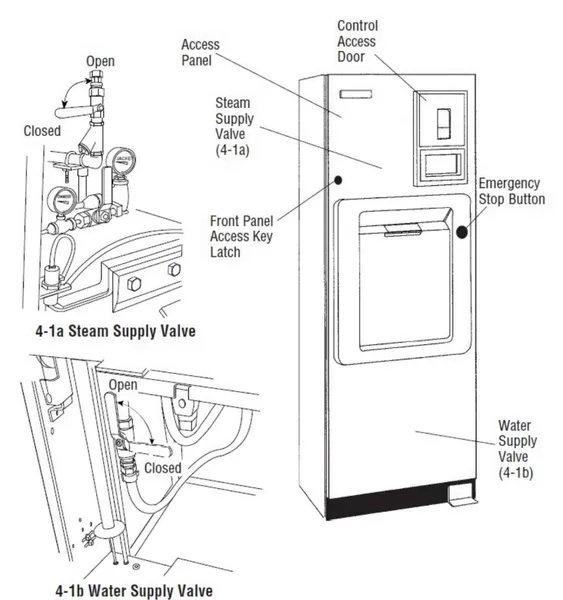
3. Open access door on operating end of the sterilizer – refer to Figure 4-1. Turn on steam and water supplies. Close access door.
Steam enters jacket and begins to warm chamber.
4. Open control access door.
a. Check printer paper roll.
A colored warning stripe is visible when roll is near its end.
b. Refer to Changing Paper Roll in Routine Maintenance Manual (P129367410) if a new paper roll is needed.
NOTE: If sterilizer is equipped with an integral electric steam generator, note the following:
i. Verify separate water supply hand valve for generator is also turned on.
5. If the Century sterilizer is a prevacuum configuration:
Run a vacuum leak test at least once each week.
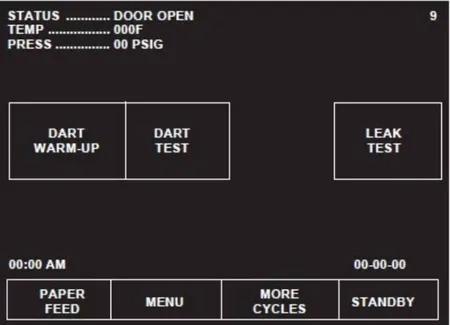
Run a DART (Bowie-Dick) test at least once a day.
Press MORE CYCLES to access the Vacuum Leak Test and DART cycle selector touch screen pads. For instructions on running these tests refer to cycle descriptions later in this section. Refer to Section 2, Sterilization Techniques.
6. Once these tests have been run (if necessary), proceed to loading sterilizer and running cycles.
Preparing Loads For Sterilization Cycles
Before sterilization, all materials must be thoroughly cleaned. Single dropped instruments processed in the Flash or Express cycles need not be cleaned if they are free of debris or soil.
The sterilizer chamber holds commonly used wrapped or unwrapped trays and containers. The top shelf can be removed, if necessary, to accommodate taller packs or tray loads.
1. Wrappers may be made of 100% cotton, 140 thread count, twoply fabric, and must be laundered.
2. Limit the size and density of each muslin pack. [Maximum size: 305 mm x 305 mm x 508 mm) (12″ x 12″ x 20”); Maximum weight: 5.4 kg (12 lb). No pack should have a density in excess of 115 kg/m3 (7.2 lb/ft3).] This ensures complete steam penetration, and minimizes moisture retention.
3. Limit the weight of wrapped instrument sets to 7.7 kg (17 lb) in order to minimize moisture retention.
4, Use to double-thickness 140-thread count muslin (or equivalent plain cotton sheet) wrappers for surgical supplies. This provides protection after sterilization.
Guidelines For Placement Of Various Loads
WARNING
SHOCK AND BURN HAZARD
Sterilizer and shelves will be hot after cycle is run. Protective gloves and apron must be worn when reloading the sterilizer following the previous operation.
WARNING
PERSONAL INJURY HAZARD
When closing the chamber door, keep hands and arms out of the door opening an ensure opening is clear of any obstructions.
1.) Open the sterilizer chamber door.
NOTE: When loading this sterilizer, note the following:
a. If a cycle has been run, sterilizer and shelves or loading car may be hot.
b. Wear clean gloves and use clean towels as pot holders when carefully placing the load/tray(s) on chamber shelves or loading car.
2.) Place all packs on edge, and arrange load to allow for maximum steam exposure so there is minimal resistance for steam passage through the load.
3.) Place utensils and treatment trays on their edges so they are sterilized and properly dried.
4.) Place instrument sets in trays that have a perforated or mesh bottom. Place flat for sterilization.
5.) In mixed loads of fabrics and hard goods, place hard goods on lower shelf. This prevents wetting of muslin packs from condensate dripping from a hard goods load.
6.) DO NOT OVERLOAD STERILIZER. Allow for steam penetration between packs. Avoid contact of load components with wall of chamber.
7.) After placing load in chamber, close chamber door. The sterilizer is now ready to run a cycle. Proceed to appropriate cycle description in this section.
8.) Materials capable of holding water, such as solid-bottomed pans, basins and trays, should be positioned so they are oriented in the same direction and so condensate can be eliminated.
Unloading Sterilizer
WARNING
BURN HAZARD
Steam may be released from the chamber when door is opened. Step back from the sterilizer each time the door is opened to minimize contact with steam vapor.
Sterilizer and shelves will be hot after cycle is run. Always wear protective gloves an apron when removing a processed load.
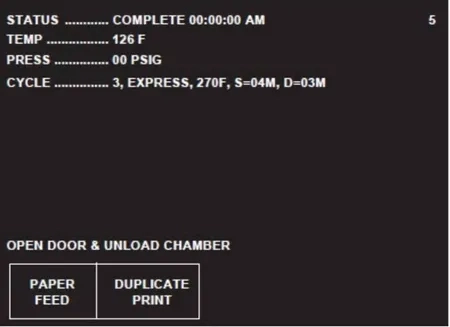
At the end of a cycle, when end-of-cycle tone sounds and display shows:
…open the chamber door.
NOTE: Wear sterile gloves and use sterile towels as “pot holders” when carefully removing load/tray(s) from the sterilizer shelves. Never place a sterilized tray on an unsterile or cold surface.
1. Remove the load from chamber shelf (shelves). Avoid unnecessary handling.
2. Visually check outside wrapper for dryness. If there are water droplets or visible moisture on the exterior of the package, or on the tape used to secure it, the pack or instrument tray is considered unacceptable.
3. To prevent condensation, transfer the load to a surface which is well-padded with fabric. Do not place load on old surface. Ensure no air conditioning or cold air vents are in close proximit
4. Remove packs or instrument trays from the padded surface when they have reached ambient (room) temperature. Depending on the items and environment of the area, this may take a minimum of one hour
IMPORTANT: After removing loads from the chamber, close the chamber door and keep the chamber door closed to minimize utility consumption.
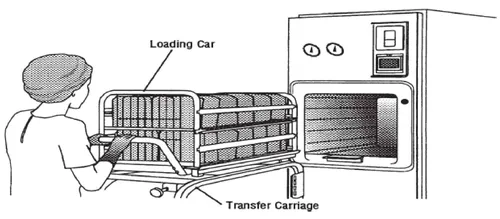
Loading Car Instructions: Loading
WARNING
BURN HAZARD
Steam may be released from the chamber when door is opened. Step back from the sterilizer each time the door is opened to minimize contact with steam vapor.
Sterilizer and shelves will be hot after cycle is run. Always wear protective gloves and apron when removing a processed load.
NOTE: The loading car and transfer carriage are for use with the 508 mm (20″) AMSCO Century Sterilizer only.
1. Open sterilizer door.
2. Verify loading car is securely fastened to transfer carriage.
3. Align front end of transfer carriage with end of sterlizer (see Figure 4-2).
4. Move carriage forward until latches engage with track inside chamber.
5. Verify transfer carriage is latched to track inside chamber by pulling transfer carriage backward (transfer carriage should remain stationary).
6. Once transfer carriage is latched to track inside chamber, release loading car from transfer carriage by lifting up carriage lock.
7. Carefully push loading car off transfer carriage and fully into sterilizer chamber.
8. Disengage transfer carriage latches from track inside chamber by pushing carriage latch knob.
9. Close chamber door.
10. Back transfer carriage away from sterilizer.
11. Sterilizer is now ready to run a cycle.
Loading Car Instructions: Unloading
WARNING
BURN HAZARD
Sterilizer, rack/shelves, and loading car will be hot after cycle is run. Always wear protective gloves and apron when removing a processed load. Protective gloves and apron must be worn when reloading sterilizer following previous operation.
WARNING
PERSONAL INJURY / EQUIPMENT DAMAGE HAZARD
When closing the chamber door, keep hands and arms out of the door opening and verify opening is clear of obstructions.
NOTE: The loading car and transfer carriage are for use with the 508 mm (20) AMSCO Century Sterilizer, only.
1. Open chamber door.
2. Move transfer carriage forward until latches engage with track inside chamber.
3. Verify transfer carriage os latched to track inside chamber by pulling transfer carriage backward (transfer carriage should remain stationary.)
4. Once transfer carriage is latched to track inside chamber, grasp loading car handle and carefully pull loading car from chamber onto transfer carriage until transfer carriage latch engages to loading car.
5. Disengage transfer carriage latches from track inside chamber by pushing carriage latch knob.
6. Close chamber door.
7. Transfer load from sterilizer area.
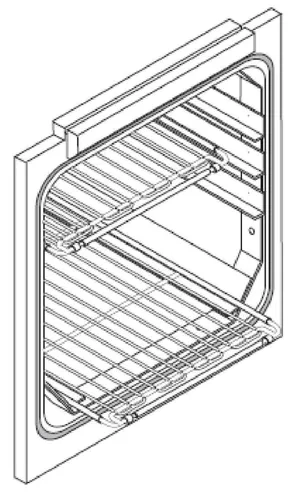
Loading/Unloading Sterilizer Equipped With Rack And Shelves
WARNING
BURN HAZARD
Steam may be released from the chamber when door is opened. Step back from the sterilizer each time the door is opened to minimize contact with steam vapor.
Sterilizer, rack/shelves, and loading car will be hot after cycle is run. Always wear protective gloves and apron when removing a processed load. Protective gloves and apron must be worn when reloading sterilizer following the previous operation.
WARNING
PERSONAL INJURY/EQUIPMENT DAMAGE HAZARD
When closing the chamber door, keep hands and arms out of the door opening and verify opening is clear of obstructions.
If sterilizer is equipped with the rack and shelves option, the shelves slide out halfway to facilitate loading and unloading. Ensure rack is returned to chamber before closing door(s).
1. Open chamber door.
2. Transfer load to shelves in chamber. Shelves slide out half-way to facilitate loading.
3. Slide shelves in after loading. Verify shelf position does not interfere with door operation (both doors if a double door unit).
4. Close chamber door.
5. The sterilizer is now ready to run a cycle. Proceed to appropriate cycle.
6. Following successful completion of sterilize cycle, unload sterilizer as follows:
a. Open chamber door (unloading side).
b. Remove load from chamber.
c. Slide empty shelves inside chamber to verify shelf position does not interfere with door operation.
d. Close chamber door.
e. Transfer load from sterilizer area.
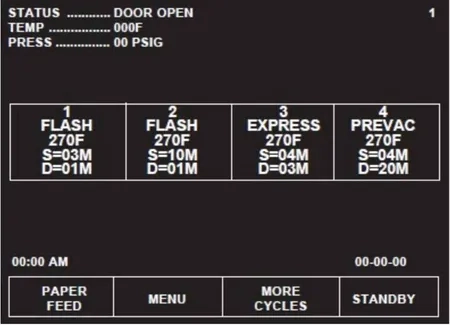
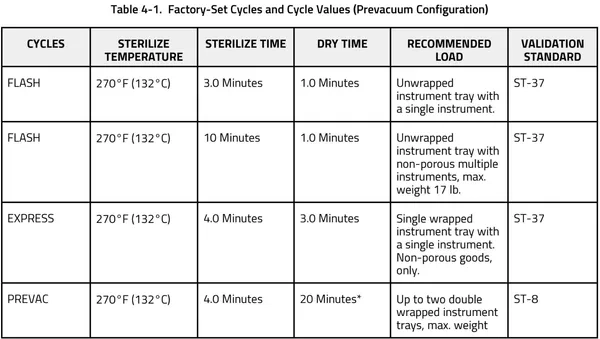
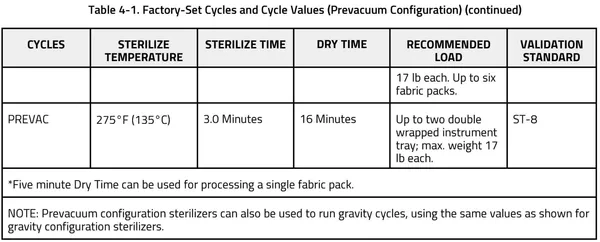
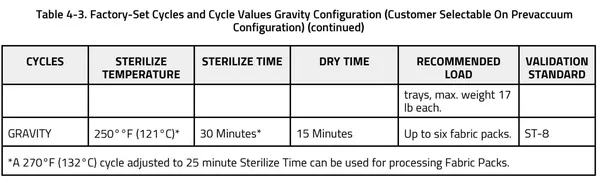
Sterilizer (Factory) Cycle Settings
AMSCO Century Sterilizers are shipped with the factory-set cycles and cycle values listed in the following tables:
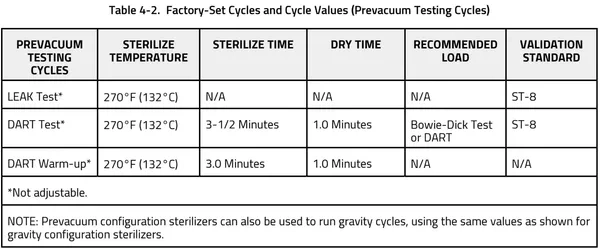
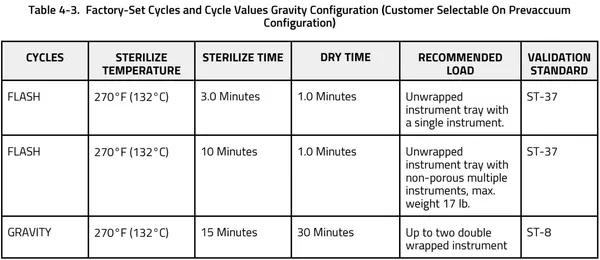
270°F Flash Cycle
WARNING
BURN HAZARD
Sterilizer, rack/shelves, and loading car will be hot after cycle is run. Always wear protective gloves and apron when removing a processed load. Protective gloves and apron must be worn when reloading sterilizer following the previous operation.
Steam may be released from the chamber when door is opened. Step back from the sterilizer each time the door is opened to minimize contact with steam vapor.
WARNING
SLIPPING HAZARD
To prevent falls, keep floors dry by immediately wiping up any spilled liquids or condensation in sterilizer loading or unloading areas.
WARNING
STERILITY ASSURANCE HAZARD
The Flash cycle is not intended for processing porous items.
CAUTION
POSSIBLE EQUIPMENT DAMAGE
Verify door opening is clear of any obstruction before closing the door(s).
This cycle is for sterilizing an unwrapped item intended for immediate use (e.g., a dropped instrument).
NOTE: Verify item is clean and free of soil.
1. Refer to earlier section, Before Operating Sterilizer before running this cycle.
2. See instructions for using loading car/transfer carriage or rack and shelves, earlier in this section for procedures to load sterilizer.
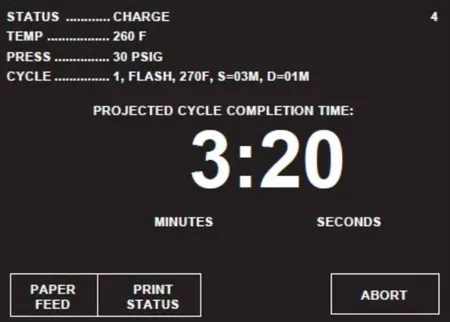
3. When sterilizer is in READY mode, press appropriate Flash cycle touch screen pad to begin Flash cycle. Refer to table 5-1 for descriptions of cycle use.
4. When sterilizer is in READY mode, press appropriate Flash cycle touch screen pad to begin Flash cycle. Refer to table 5-1 for descriptions of cycle use.
NOTE: For more cycle information, note the following:
a. If wrong cycle has been selected, refer to Section 4.19, Aborting Cycles.
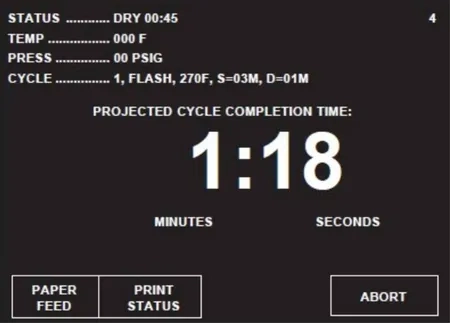
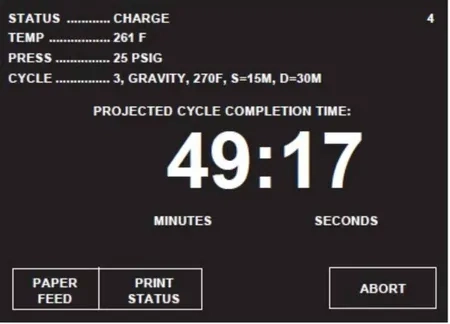
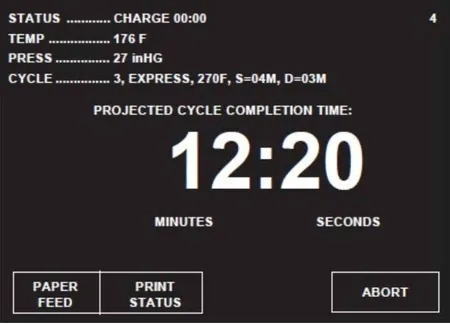
b. Countdown timer on display is estimated, timer self-corrects estimated time at beginning of each phase.
ACTIVATE SEAL – Steam enters door seal pressing seal against inside surface of door.
PURGE – Chamber is purged with steam. Start of condition is printed.
CHARGE – Chamber is charged with steam. Start of steam charge is printed.
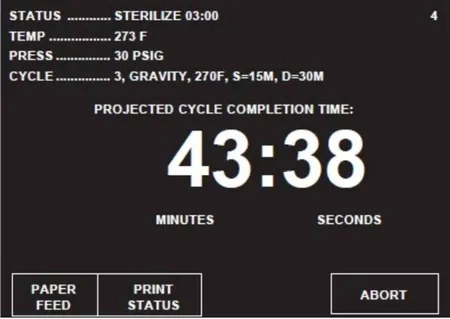
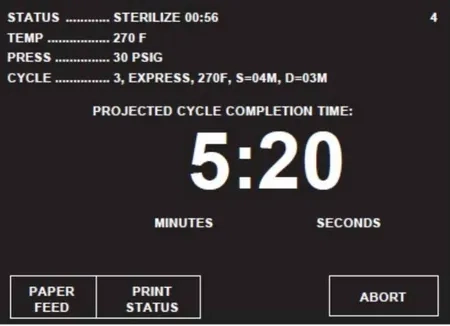
STERILIZE – Start of sterilize exposure is printed when chamber reaches sterilization temperature. Chamber temperature is printed every minute.
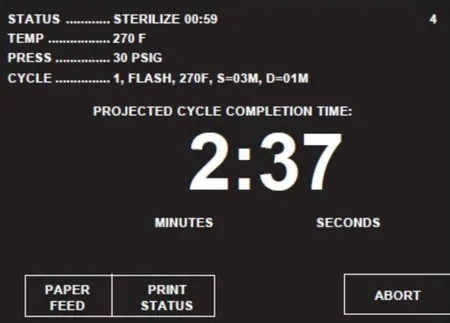
FAST EXHAUST – Start of exhaust is printed and chamber is exhausted to 4.0 psig.
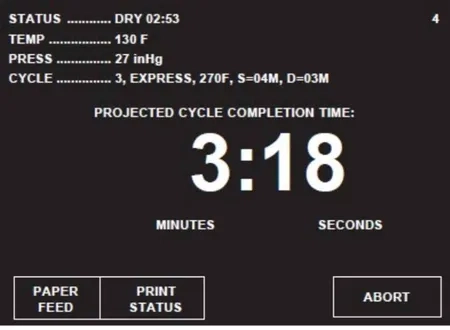
DRY – Start of dry is printed and display counts down dry time remaining. During a Flash cycle, Dry is intended to remove excess steam vapor before opening the door.
NOTE: If zero dry time is selected, the sterilizer still draws a slight vacuum.
AIR BREAK – Chamber is returned to atmospheric pressure.
RETRACT SEAL – A Vacuum is drawn on the seal, retracting it from inner surface of door.
NOTE – If zero dry time is selected, the sterilizer door automatically opens slightly, while the display indicates a vent phase. This allows steam to escape the chamber before unloading.
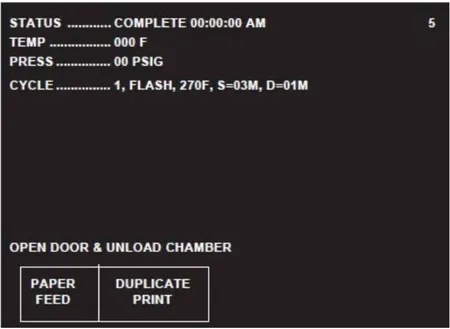
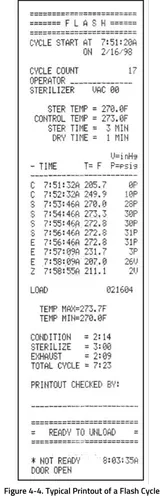
COMPLETE – Complete tone sounds. Cycle summary and end of cycle messages are printed.
5. Unload sterilizer (see instructions for using loading car/transfer carriage or rack and shelves, earlier in this section, for procedures to remove load).
Review and verify critical cycle parameters were achieved during processing, then sign printout to indicate verification.
Gravity Cycle
WARNING
BURN HAZARD
Sterilizer, rack/shelves, and loading car will be hot after cycle is run. Always wear protective gloves and apron when removing a processed load. Protective gloves and apron must be worn when reloading sterilizer following the previous operation.
Steam may be released from the chamber when door is opened. Step back from the sterilizer each time the door is opened to minimize contact with steam vapor.
SLIPPING HAZARD
To prevent falls, keep floors dry by immediately wiping up any spilled liquids or condensation in sterilizer loading or unloading areas.
PERSONAL INJURY / EQUIPMENT DAMAGE HAZARD
When closing the chamber door, keep hands and arms out of the door opening an ensure opening is clear of any obstructions.
- 270°F cycle is used for sterilizing double-wrapped instrument trays.
- 250°F cycle is used for sterilizing fabric packs.
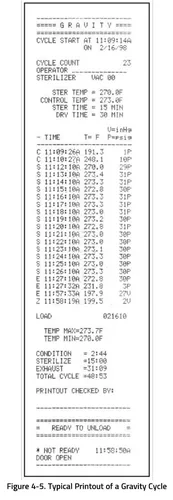
NOTE: The cycle shown below is a typical 270°F gravity cycle.
1. Refer to earlier section, Before Operating Sterilizer before running this cycle.
2. See instructions for using loading car/transfer carriage or rack and shelves, earlier in this section, for procedures to load sterilizer.
3. To start Gravity cycle, press appropriate GRAVITY touch screen pad. Refer to Table 5-1 for descriptions of cycle use.
4. Sterilizer automatically progresses through cycle, as follows:
NOTE: If the wrong cycle has been selected, refer to Section 4.19, Aborting Cycles.
ACTIVATE SEAL – Steam enters the door seal pressing seal against inside surface of door.
PURGE – Chamber is purged with steam. Start of condition is printed.
NOTE: Countdown timer on the display is estimated, timer self-corrects estimated time at the beginning of each phase.
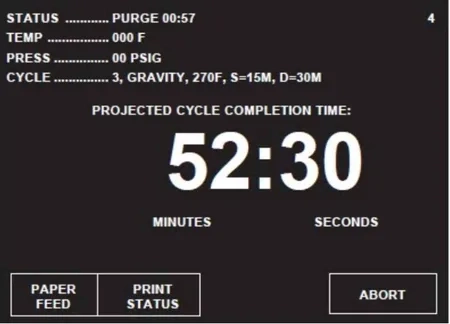
CHARGE – Chamber is charged with steam. Start of steam charge is printed.
STERILIZE – Start of sterilize exposure is printed when chamber reaches sterilization temperature. Chamber temperature is printed every minute.
FAST EXHAUST – Start of exhaust is printed and chamber is exhausted to 4.0 psig.
DRY – Start of dry is printed and display counts down dry time remaining.
NOTE: If zero dry time is selected, the sterilizer draws a slight vacuum.
AIR BREAK – Chamber is returned to atmospheric pressure.
RETRACT SEAL – A vacuum is drawn on the seal, retracting it from inner surface of door.
NOTE – If zero dry time is selected, the sterilizer door automatically opens slightly, while the display indicates a vent phase. This allows steam to escape the chamber before unloading.
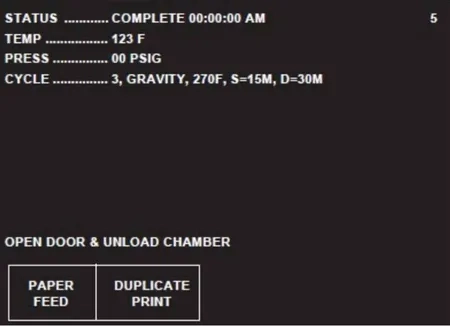
COMPLETE – Complete tone sounds. Cycle summary and end of cycle messages are printed.
5. Unload sterilizer (see instructions for using the loading car/transfer carriage or rack and shelves, earlier in this section, for procedures to remove load.
Review and verify critical cycle parameters were achieved during processing, then sign printout to indicate verification.
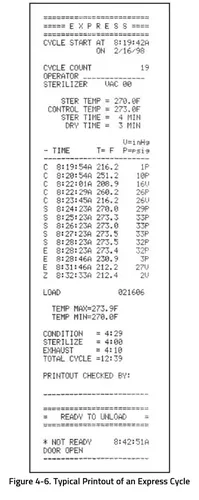
270°F Express Cycle
WARNING
BURN HAZARD
Sterilizer, rack/shelves, and loading car will be hot after cycle is run. Always wear protective gloves and apron when removing a processed load. Protective gloves and apron must be worn when reloading sterilizer following the previous operation.
Steam may be released from the chamber when door is opened. Step back from the sterilizer each time the door is opened to minimize contact with steam vapor.
WARNING
SLIPPING HAZARD
To prevent falls, keep floors dry by immediately wiping up any spilled liquids or condensation in sterilizer loading or unloading areas.
WARNING
STERILITY ASSURANCE HAZARD
The Express cycle is only intended for use with a single instrument in a single wrapped instrument tray.
The Express cycle is not intended for processing porous items (except the tray wrapper).
WARNING
PERSONAL INJURY / EQUIPMENT DAMAGE HAZARD
When closing the chamber door, keep hands and arms out of the door opening an ensure opening is clear of any obstructions.
This cycle is for sterilizing a single instrument in a single-wrapped instrument tray (e.g, dropped instrument).
NOTE: For more cycle information, note the following:
1. Verify item is clean and free of soil.
2. This cycle is available for Century prevacuum sterilizers, only. Refer to Section 2.2, Special Information Regarding The Express Cycle before running an Express cycle.
1. Refer to Section 4.1, Before Operating Sterilizer before running this cycle.
2. See instructions for using loading car/transfer carriage or rack and shelves, earlier in this section, for procedures to load sterilizer.
3. Press EXPRESS touch screen pad to start Express cycle. Refer to Table 5-1 for descriptions of cycle use.
4. Sterilizer automatically progresses through cycle, as follows:
NOTE: If the wrong cycle has been selected, refer to Section 4.19, Aborting Cycles.
ACTIVATE SEAL – Steam enters the door seal pressing seal against inside surface of door.
PURGE – Chamber is purged with steam. Start of condition is printed.
NOTE: Countdown timer on the display is estimated, timer self-corrects estimated time at the beginning of each phase.
PULSE #1 (and PULSE #2) – Vacuum point is printed and pressure /vacuum pulse is repeated.
CHARGE – Chamber is charged with steam. Start of steam charge is printed.
STERILIZE – Start of sterilize exposure is printed when the chamber reaches sterilization temperature. Chamber temperature is printed every minute.
FAST EXHAUST – Start of exhaust is printed and chamber is exhausted to 4.0 psig.
DRY – Start of dry is printed and display counts down dry time remaining.
AIR BREAK – Chamber is returned to atmospheric pressure.
RETRACT SEAL – A vacuum is drawn on the seal, retracting it from inner surface of door.
5. Unload sterilizer (see instructions for using loading car/transfer carriage or rack and shelves, earlier in this section, for procedures to remove load)
Review and verify critical cycle parameters were achieved during processing, then sign printout to indicate verification.
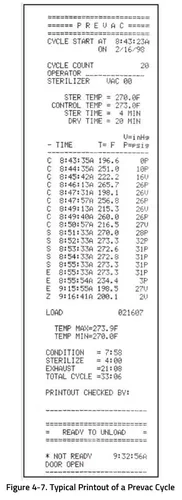
270°F Prevac Cycle
WARNING
BURN HAZARD
Sterilizer, rack/shelves, and loading car will be hot after cycle is run. Always wear protective gloves and apron when removing a processed load. Protective gloves and apron must be worn when reloading sterilizer following the previous operation.
Steam may be released from the chamber when door is opened. Step back from the sterilizer each time the door is opened to minimize contact with steam vapor.
WARNING
SLIPPING HAZARD
To prevent falls, keep floors dry by immediately wiping up any spilled liquids or condensation in sterilizer loading or unloading areas.
WARNING
PERSONAL INJURY / EQUIPMENT DAMAGE HAZARD
When closing the chamber door, keep hands and arms out of the door opening an ensure opening is clear of any obstructions.
This cycle is used for sterilizing double-wrapped instrument trays or fabric packs.
NOTE: This cycle is only available on prevacuum configuration sterilizers.
1. Refer to Section 4. 1, Before Operating Sterilizer before running this cycle.
2. See instructions for using loading car/transfer carriage or rack and shelves, earlier in this section, for procedures to load sterilizer.
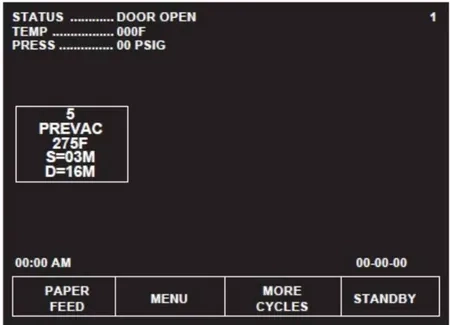
3. Press PREVAC touch screen pad to start the Prevacuum cycle. Refer to Table 5-1 for descriptions of cycle use.
4. Sterilizer automatically progresses through cycle, as follows:
NOTE: If the wrong cycle has been selected, refer to Section 4.19, Aborting Cycles.
ACTIVATE SEAL – Steam enters the door seal, pressing seal against inside surface of door.
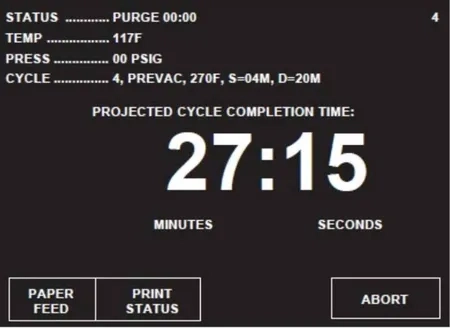
PURGE – Chamber is purged with steam. Start of condition is printed.
NOTE: Countdown timer on the display is estimated, timer self-corrects estimated time at the beginning of each phase.
PRESSURE/VACUUM PULSES #1 – #4 – Vacuum point is printed and pressure/vacuum pulse is repeated.
CHARGE – Chamber is charged with steam. Start of steam charge is printed
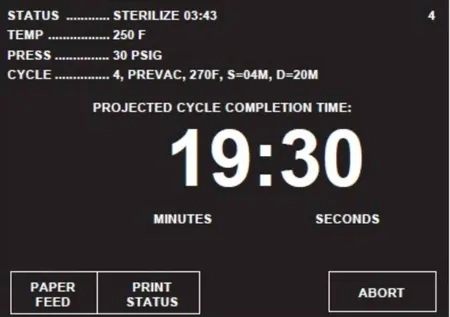
STERILIZE – Start of sterilize exposure is printed when the chamber reaches sterilization temperature. Chamber temperature is printed every minute.
FAST EXHAUST – Start of exhaust is printed and chamber is exhausted to four psig.
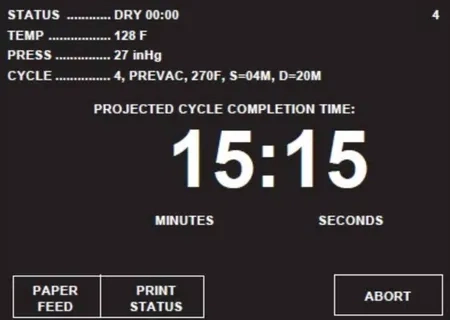
DRY – Start of dry is printed and display counts down dry time remaining
AIR BREAK – Chamber is returned to atmospheric pressure.
RETRACT SEAL – A vacuum is drawn on the seal, retracting it from inner surface of door.
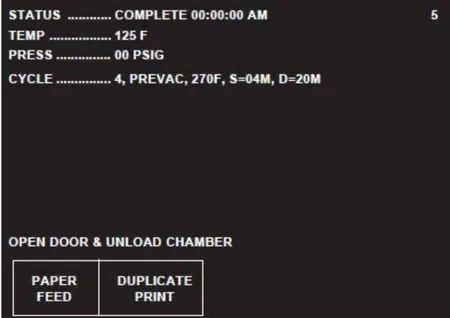
COMPLETE – Complete tone sounds. Cycle summary and end of cycle messages are printed.
5. Unload sterilizer (see instructions for using the loading car/transfer carriage or rack and shelves, earlier in this section, for procedures to remove load).
Review and verify critical cycle parameters were achieved during processing, then sign printout to indicate verification.
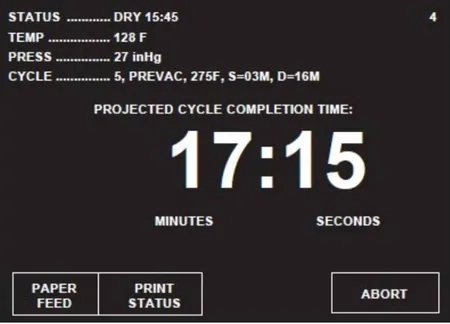
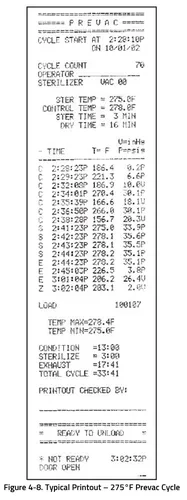
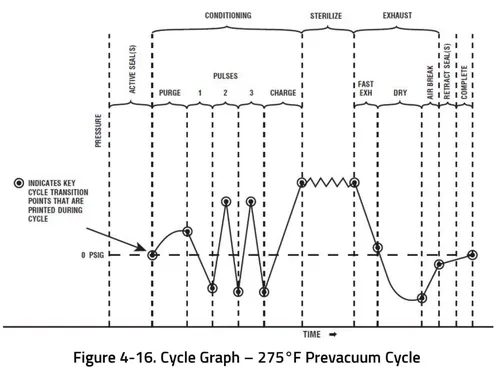
275°F Prevac Cycle
WARNING
BURN HAZARD
Sterilizer, rack/shelves, and loading car will be hot after cycle is run. Always wear protective gloves and apron when removing a processed load. Protective gloves and apron must be worn when reloading sterilizer following the previous operation.
Steam may be released from the chamber when door is opened. Step back from the sterilizer each time the door is opened to minimize contact with steam vapor.
WARNING
SLIPPING HAZARD
To prevent falls, keep floors dry by immediately wiping up any spilled liquids or condensation in sterilizer loading or unloading areas.
WARNING
PERSONAL INJURY / EQUIPMENT DAMAGE HAZARD
When closing the chamber door, keep hands and arms out of the door opening an ensure opening is clear of any obstructions.
This cycle is used for sterilizing double-wrapped instrument trays or fabric packs.
NOTE: This cycle is only available on prevacuum configuration sterilizers.
1. Refer to Section 4. 1, Before Operating Sterilizer before running this cycle.
2. See instructions for using loading car/transfer carriage or rack and shelves, earlier in this section, for procedures to load sterilizer.
3. Press PREVAC touch screen pad to start the Prevacuum cycle. Refer to Table 5-1 for descriptions of cycle use.
4. Sterilizer automatically progresses through cycle, as follows:
NOTE: If the wrong cycle has been selected, refer to Section 4.19, Aborting Cycles.
ACTIVATE SEAL – Steam enters the door seal, pressing seal against inside surface of door.
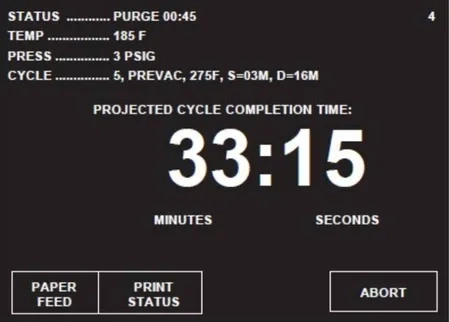
PURGE – Chamber is purged with steam. Start of condition is printed.
NOTE: Countdown timer on the display is estimated, timer self-corrects estimated time at the beginning of each phase.
PRESSURE/VACUUM PULSES #1 – #3 – Vacuum point is printed and pressure/vacuum pulse is repeated.
CHARGE – Chamber is charged with steam. Start of steam charge is printed
STERILIZE – Start of sterilize exposure is printed when the chamber reaches sterilization temperature. Chamber temperature is printed every minute.
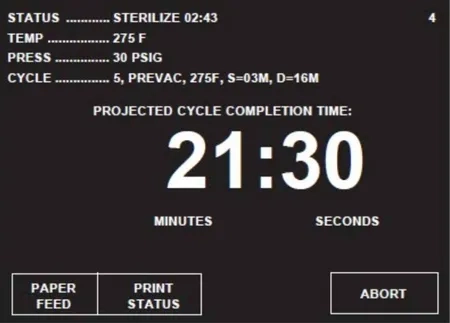
FAST EXHAUST – Start of exhaust is printed and chamber is exhausted to four psig.
DRY – Start of dry is printed and display counts down dry time remaining
AIR BREAK – Chamber is returned to atmospheric pressure.
RETRACT SEAL – A vacuum is drawn on the seal, retracting it from inner surface of door.
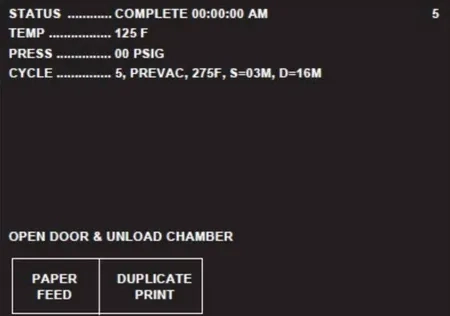
5. Unload sterilizer (see instructions for using the loading car/transfer carriage or rack and shelves, earlier in this section, for procedures to remove load).
Review and verify critical cycle parameters were achieved during processing, then sign printout to indicate verification.
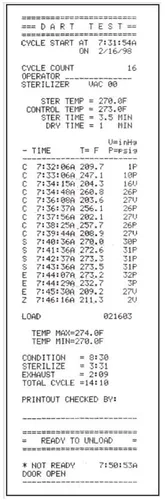
DART (Bowie-Dick) Test (Prevacuum Sterilizer Only)
WARNING
BURN HAZARD
Sterilizer, rack/shelves, and loading car will be hot after cycle is run. Always wear protective gloves and apron when removing a processed load. Protective gloves and apron must be worn when reloading sterilizer following the previous operation.
Steam may be released from the chamber when door is opened. Step back from the sterilizer each time the door is opened to minimize contact with steam vapor.
WARNING
PERSONAL INJURY / EQUIPMENT DAMAGE HAZARD
When closing the chamber door, keep hands and arms out of the door opening an ensure opening is clear of any obstructions.
This cycle is used to conduct a Bowie-Dick test on the sterilizer.
Tests such as DART (Daily Air Removal Test) or Bowie-Dick are designed to document the removal of residual air from a sample challenge load.
A DART (Bowie-Dick test) cycle should be run daily before processing any loads. The chamber must be at operating temperature when DART (Bowie-Dick test) cycle is performed. The DART WARM-UP cycle should be completed prior to performing DART (bowie-Dick test) cycle.
1. Refer to section 4.1, Before Operating Sterilize and Section 2, Sterilization Techniques to prepare the unit for running
2. Pest touch screen touch screen pad at the cycle selection menu to access second screen of cycles, Press DART TEST touch screen pad.
3. A second meu then appears on the screen. A DART test should only be run in a machine that is at operating temperature (I.e., has run one or more cycles). If sterilizer has not run any cycles prior to DART TEST, run DART WARM-UP CYCLE.
a. Operator is prompted to close chamber door, if it is open. Once closed, door seals automatically.
b. Sterilizer automatically runs a cycle with three minute sterilize and one minute dry values.
c. Once Warm-up cycle is complete, display returns to cycle select menu.
4. Open chamber door (if it is not already open). Load DART indicator and close door.
5. Start DART cycle. Cycle runs automatically, as follows:
ACTIVATE SEAL – Steam enters door seal, pressing seal against inside surface of door.
PURGE – Chamber is purged with steam. Start of condition is printed.
PULSE #1 through PULSE #4 – Vacuum point is printed and pressure/vacuum pulse is repeated.
CHARGE – Chamber is charged with steam. Start of steam charge is printed.
CHARGE – Chamber is charged with steam. Start of steam charge is printed.
STERILIZE – Start of sterilize exposure is printed when the chamber reaches sterilization temperature. Chamber temperature is printed every minute.
FAST EXHAUST – Start of exhaust is printed and chamber is exhausted to 4.0 psig.
DRY – Start of dry is printed and display counts down dry time remaining.
AIR BREAK – Chamber is returned to atmospheric pressure.
RETRACT SEAL – A vacuum is drawn on the seal, retracting it from inner surface of door.
COMPLETE – Complete tone sounds. Cycle summary and end of cycle messages are printed.
Review and verify critical cycle parameters were achieved during processing, then sign printout to indicate verification.
6. Once cycle is complete:
a. Open chamber door by pressing on foot pedal.
b. Unload DART test pack.
c. Refer to instructions packaged with DART indicator. Forward the exposed test strip to the appropriate personnel for examination
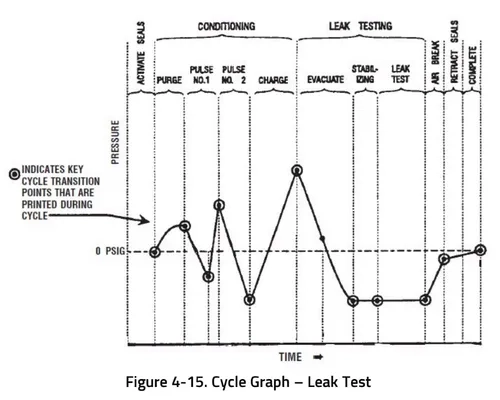
Vacuum Leak Test (Prevacuum Sterilizer Only)
WARNING
STERILITY ASSURANCE HAZARD
According to AAMI standards, a measured leak rate greater than 1.0 mm Hg/minute indicates a problem with the sterilizer. Refer the situation to a qualified service technician before using the sterilizer further.
WARNING
PERSONAL INJURY / EQUIPMENT DAMAGE HAZARD
When closing the chamber door, keep hands and arms out of the door opening an ensure opening is clear of any obstructions.
This cycle is used for testing vacuum integrity of the sterilizer’s piping.
A Vacuum Leak Test cycle should be run on the sterilizer at least once each week. In this cycle, the sterilizer automatically checks for vacuum leaks in the piping and door seal. If the sterilizer fails the leak test, it must be inspected by a service technician. This test is not a substitute for a Bowie-Dick Test. The leak test can also be used to confirm that the sterilizer piping is intact after performing repairs.
NOTE: The measured leak rate (mm Hg per minute) is calculated by the control over a timed 10 minute period and is included in the cycle printout. A leak rate of 1.0mm Hg/minute or less is considered acceptable.
1. Before running leak test cycle, refer to Section 4.1, Before Operating Sterilizer.
2. Press MORE CYCLES. Leak test cycle touch screen pad appears on display.
3. To start leak test, press LEAK TEST touch screen pad. Printer records cycle start. Cycle runs automatically as follows:
NOTE: Cycle requires 25-35 minutes to complete.
ACTIVATE SEAL – Steam enters door seal, pressing seal against inside surface of door.
PURGE – Chamber is purged; printer records end of purge.
PULSE #1 (and PULSE #2) – Two vacuum and pressure pulses then occur and printer records each.
CHARGE – After the pressure pulses, temperature rises to 270°F (132° C), unit begins to draw a vacuum for 10 minutes. (Printer records temperature and pressure at beginning of 10 minute vacuum time.)
LEAK TEST/EVACUATING – Printer records temperature and vacuum at end of evacuation time.
LEAK TEST/STABILIZING – Two minute stabilization period begins after 10 minute evacuation is completed.
LEAK TEST – 10 minute leak test period begins after two minute stabilization is completed. Printer records
calculated leak rate (mm Hg per minute) after 10 minute leak time.
AIR BREAK – Chamber is returned to atmospheric pressure, complete tone sounds and cycle summary and end of cycle messages are printed.
RETRACT SEAL – A vacuum is drawn on the seal, retracting it from inner surface of door.
COMPLETE – Complete tone sounds. Cycle summary and end of cycle messages are printed.
Review and verify critical cycle parameters were achieved during processing, then sign printout to indicate verification.
4. Once sterilizer completes and passes leak test, unit can be used.

Optional Liquid Cycle
WARNING
EXPLOSION HAZARD
This sterilizer is not designed to process flammable compounds.
WARNING
BURN HAZARD
When sterilizing liquids, to prevent personal injury or property damage resulting from bursting bottles and hot fluid, you must observe the following procedures:
- Use Liquid Cycle only; no other cycle is safe for processing liquids.
- Use vented closures; do not use screw caps or rubber stoppers with crimped seal.
- Use only Type I borosilicate glass bottles; do not use ordinary glass bottles or any container not designed for sterilization.
- Do not allow hot bottles to be jolted; this can cause hot-bottle explosions. Do no move bottles if any boiling or bubbling is present.
- It is inappropriate for a health care facility to sterilize liquids for direct patient contact.
- Steam may be released from the chamber when door is opened. Step back from the sterilizer each time the door is opened to minimize contact with steam vapor.
- Sterilizer, rack shelves, and loading car will be hot after cycle is run. Always wear protective gloves and apron when removing a processed load. Protective gloves and apron must be worn when reloading sterilizer following the previous operation.
CAUTION
POSSIBLE EQUIPMENT DAMAGE
Sterilization of chloride-containing solutions (e.g., saline) can cause chamber corrosion and is not recommended by the manufacturer. If, however, chloride-containing solutions must be processed, clean the chamber after each use.
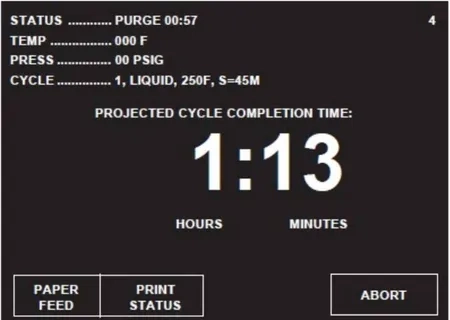
This cycle is used for sterilizing liquids in vented closures.
1. Refer to earlier section, Before Operating Sterilizer before running this cycle.
2. See instructions for using loading car/transfer carriage or rack and shelves, earlier in this section, for procedures to
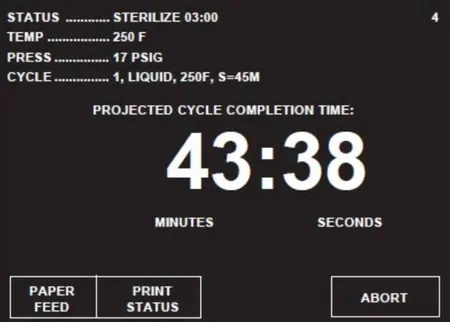
3. Press LIQUID touch screen pad to start Liquid cycle.
4. Sterilizer automatically progresses through cycle, as follows:
NOTE: If the wrong cycle has been selected, refer to Section 4.19, Aborting Cycles.
ACTIVATE SEAL – Steam enters door seal pressing seal against inside surface of door.
PURGE – Chamber is purged with steam. Start of condition is printed.
NOTE: Countdown timer on the display is estimated, timer self-corrects estimated time at the beginning of each phase.
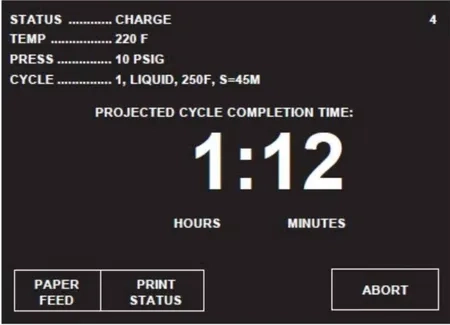
CHARGE – Chamber is charged with steam. Start of steam charge is printed.
STERILIZE – Start of sterilize exposure is printed when chamber reaches sterilization temperature. Chamber temperature is printed every five minutes.
SLOW EXHAUST – Start of exhaust is printed and chamber is exhausted to 0.0 psig.
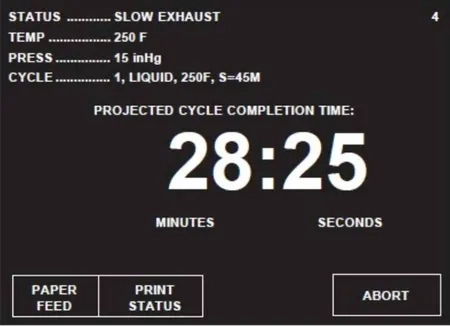
SLOW EVACUATE – A vacuum slowly drawn in chamber to 5.0 in Hg. This phase assures chamber is cooled to 208°F/95°C.
VAPOR REMOVAL – Filtered air enters chamber to relieve vacuum within chamber. Steam is exhausted from door seal. Chamber vapor vents, through slit opening between seal and door, into sterilizer cabinet for six minutes.
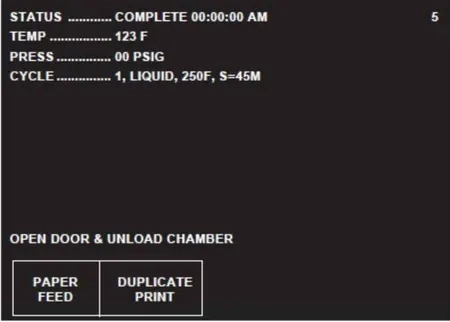
COMPLETE – Complete tone sounds. Cycle summary and end of cycle messages are printed.
5. Unload sterilizer (see instructions for using loading car/transfer carriage or rack and shelves earlier in this section for procedures to remove load).
Review and verify critical cycle parameters were achieved during processing, then sign printout to indicate verification.
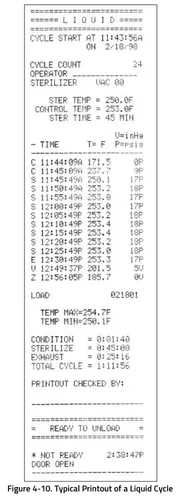
Sterilization Techniques for Optional Liquid Cycle
WARNING
EXPLOSION HAZARD
This sterilizer is not designed to process flammable compounds.
WARNING
BURN HAZARD
When sterilizing liquids, to prevent personal injury or property damage resulting from bursting bottles and hot fluid, you must observe the following procedures:
- Use Liquid Cycle only; no other cycle is safe for processing liquids.
- Use vented closures; do not use screw caps or rubber stoppers with crimped seal.
- Use only Type I borosilicate glass bottles; do not use ordinary glass bottles or any container not designed for sterilization.
- Do not allow hot bottles to be jolted; this can cause hot-bottle explosions. Do no move bottles if any boiling or bubbling is present.
- It is inappropriate for a health care facility to sterilize liquids for direct patient contact.
CAUTION
POSSIBLE EQUIPMENT DAMAGE
Sterilization of chloride-containing solutions (e.g., saline) can cause chamber corrosion and is not recommended by the manufacturer. If, however, chloride-containing solutions must be processed, clean the chamber after each use.
IMPORTANT: It is inappropriate for a health care facility to sterilize liquids for direct patient contact.
Volume of Liquid in One Container – 1000 mL
Minimum Recommended Sterilize Time at 250°F (121°C) in Minutes – 45
Number of Containers – 3
Recommendations for Sterilizing Liquids
WARNING
EXPLOSION HAZARD
This sterilizer is not designed to process flammable compounds.
WARNING
BURN HAZARD
When sterilizing liquids, to prevent personal injury or property damage resulting from bursting bottles and hot fluid, you must observe the following procedures:
Use Liquid Cycle only; no other cycle is safe for processing liquids.
Use vented closures; do not use screw caps or rubber stoppers with crimped seal.
Use only Type I borosilicate glass bottles; do not use ordinary glass bottles or any container not designed for sterilization.
Do not allow hot bottles to be jolted; this can cause hot-bottle explosions. Do no move bottles if any boiling or bubbling is present.
It is inappropriate for a health care facility to sterilize liquids for direct patient contact.
CAUTION
POSSIBLE EQUIPMENT DAMAGE
Sterilization of chloride-containing solutions (e.g., saline) can cause chamber corrosion and is not recommended by the manufacturer. If, however, chloride-containing solutions must be processed, clean the chamber after each use.
IMPORTANT: Please read the following paragraphs before sterilizing any liquids in your sterilizer. It is inappropriate for a health care facility to sterilize liquids for direct patient contact.
Borosilicate glass is required because it is a superior glass capable of resisting thermal shock. If glass not as thermally resistant is used, a greater potential for bursting exists.
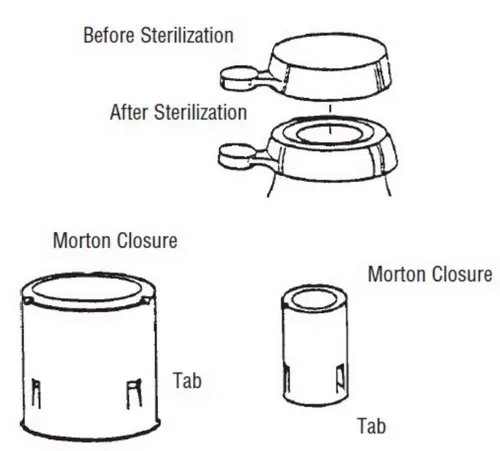
Vented closures are required because, by design, they release internal pressure build0up by automatically venting the containers, whereas pressure in unvented containers remains until the contents have cooled. Examples of vented closures are shown in figure 4-11.
Sterilizing liquids in any other type of container or with the use of non-vented closures requires a sterilizer specifically designed for that purpose.
When loading, place small bottles in a separate basket to minimize sliding. Always use side rails on the loading car to prevent containers or baskets from falling off.
Aborting Cycles
WARNING
BURN HAZARD
Steam may be released from the chamber when door is opened. Step back from the sterilizer each time the door is opened to minimize contact with steam vapor.
Sterilizer, rack/shelves, and loading car will be hot after cycle is run. Always wear protective gloves and apron must be worn when reloading sterilizer following the previous operation.
It may be necessary to end a processing cycle, possibly because the wrong cycle was selected or the sterilizer begins functioning incorrectly. A cycle can be aborted at any time during processing by pressing the ABORT touch screen pad.
1. Touch ABORT touch screen pad.
- Status line on display changes to EXHAUSTING CHAMBER, if there is pressure in chamber.
- Sterilizer exhausts chamber of steam.
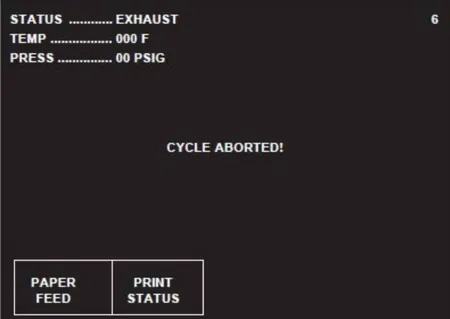
2. Once chamber reaches 4.0 psig, sterilizer removes vapor from chamber for one minute.
3. Once vapor removal is over, status line changes to COMPLETE. When complete, sterilizer chamber can be unloaded following the instructions earlier in this section of the manual.
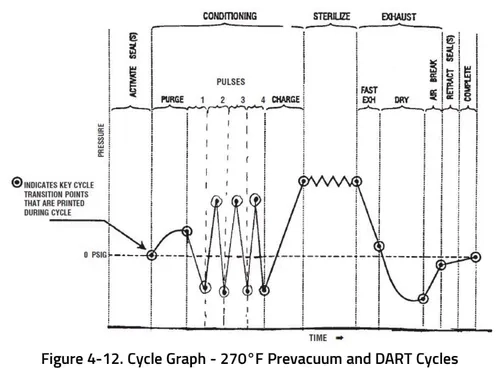
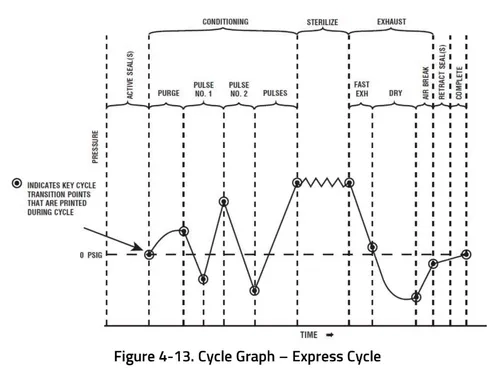
Cycle Graphs
These cycle graphs provide a visual representation of sterilizer cycles and their phases.

As always if you have any questions about this process or anything else please feel free to contact us and take advantage of our “FREE TECH SUPPORT.”
We also offer FREE VIRTUAL TECH SUPPORT to “See and Talk” with a “Real Time Live Technician” for any problems you may be in need of help with.
You can also use our “FREE MAINTENANCE PROGRAM”. Take the guesswork and worrying about what unit is due for maintenance and which maintenance cycle it is time for. We will keep track of all your autoclaves and let you know when it’s time for anything.
The Refurbished Steris Amsco V116 Steam Sterilizer is available to view on our site here.