


SciCan StatPure Installation Guide
We mention the importance of following the instructions properly for your autoclaves… But that’s also true for every device in your practice, even your water filtration system. Proper installation, mounting and connections to your existing system. Operating the system properly day in and day out. Even proper maintenance to ensure its longevity and water quality. It’s all just as important here than ever.
Which is why, in this article, we’d like to look at the instructions for one water filtration system in particular, the SciCan StatPure. We’re going to look at the proper installation instructions for the StatPure that come directly from SciCan.
But if you have any questions about the StatPure, water filtration systems, or anything else, please give us a call at 704-966-1650 and we’ll help you find what you need.
System Mounting
Mount the STATPURE in the desired location using the provided drill template.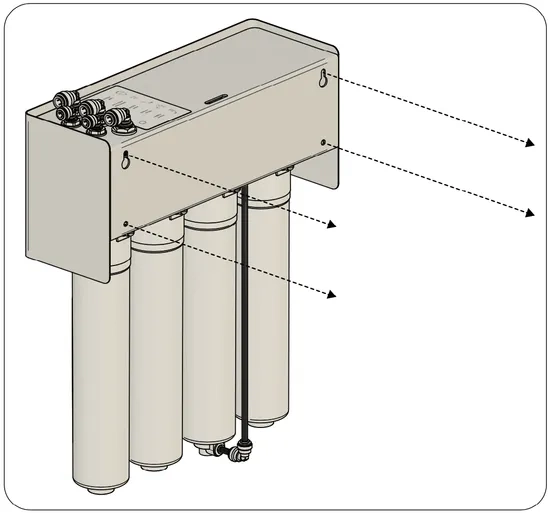
Installer must supply appropriate mounting screws (recommended #10 screws).
Note: For best stability it is recommended to use four mounting screws.
1. Using the included template, tape it to the mounting surface, level, then mark hole positions.
2. Drill pilot holes to match screw size.
3. Install the TOP two screws and drive them in leaving about 1/8” space behind the head.
4. Hang the system on the TOP screws using the keyholes on the back of the system.
Note: installing only the two TOP screws allows the system to be easily unmounted.
5. To install the LOWER two screws, remove the system cover.
6. Carefully install the screws around the tubing in the lower round holes and snug. Snug the top screws. Replace the cover after mounting.
The system may also be installed:
> Vertically (recommended)
> Horizontally (90° orientation) with filters pointing out towards the cabinet opening (for easy access during filter changes)
> Lying flat or resting on cabinet decking if mounting is not possible.
Included swivel elbow fittings allow flexible routing of the tubing.
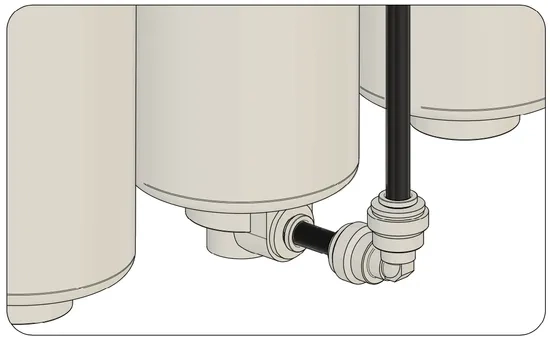
TIP – Depending on how much space there is to maneuver within the cabinet, it may be easier to keep filter #2 Hyperfiltration installed in the manifold during the mounting process, uninstalling the remaining filters until after the system is mounted and tubing is routed.
Important! When attaching tubing to the push-type fittings, make certain all tubing cuts are straight and free from excess material. Tubing must be firmly inserted into the fitting (push in until you feel the click) to avoid leaks. The typical plunge depth into fittings is 11/16” and it may be helpful to mark that length on the tubing prior to inserting to make certain engaged all the way into the fitting.
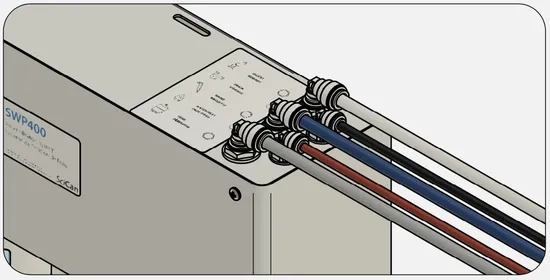
Water Supply Connection
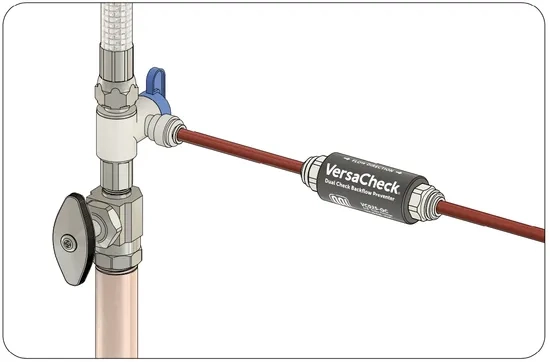 1. Turn off the cold water supply.
2. Provide for a 1/4” connection to the cold water supply. A ¼” angle stop valve is supplied with the STATPURE system. Check local codes.
3. From the provided ¼” red LLDPE tubing, cut a short piece approximately 5 cm / 2” and install one end to the angle stop valve (or alternative fitting). Install the other end into the VersaCheck QC, ensuring the VersaCheck’s flow direction arrows are pointing towards the STATPURE unit.
4. Connect remaining red tubing from the VersaCheck QC to the STATPURE inlet on the system manifold.
Drain Connection
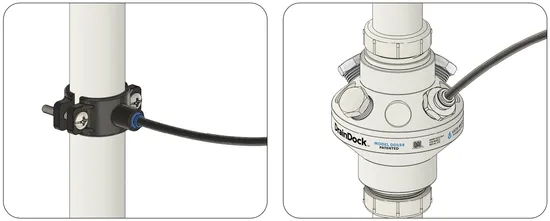
> Install a drain connection using one of the following:
> Included drain saddle clamp
DrainDock® Multi-Port Drain Adapter (optional accessory)
IMPORTANT!:
> Install above the P-trap
> Position as low as possible
Connect the ¼” black tubing from the STATPURE drain outlet to the drain connection.
NOTE: Local codes can vary greatly, so it is important to verify the preferred method prior to installation. Every STATPURE has a pressurized drain discharge and multiple check valves in the system to prevent backflow from drain connections.
Faucet Installation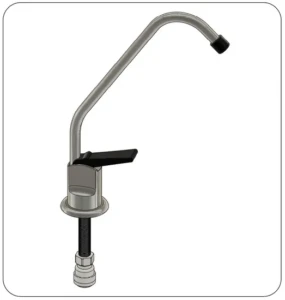
It is mandatory to install the chrome faucet, as this provides an efficient methodfor fully draining the system & water storage tank for regular maintenance.
1. Mount the bottle filling faucet in the desired location.
2. It may be necessary to drill a 0.50–1.00 inch diameter hole if required.
3. Install all provided washers and gaskets.
4. Thread the faucet adapter fitting to the faucet base.
5. Connect the 3/8” white tubing from the faucet to the STATPURE faucet outlet on the manifold.
Autoclave Fill Wand Installation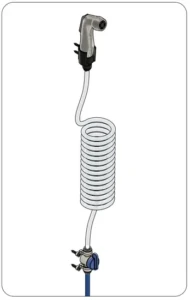
1.Select a convenient mounting location for the included fill wand clip.
2. Ensure adequate length of 3/8” blue tubing is provided to ensure the coiled fill wand tubing is not stressed when in use.
3. Secure the 3/8” inline valve (using the provided mounting cable ties) to the 3/8” blue tubing.
4. Connect:
a. Coiled tubing to the inline valve
b. 3/8” blue tubing to the STATPURE autoclave fill wand outlet labelled on the system manifold
Important! To protect the longevity of the autoclave fill wand, ensure it is not dropped or banged. When not in use, it is strongly recommended to always turn the in-line valve to the CLOSED position.
Storage Tank Installation
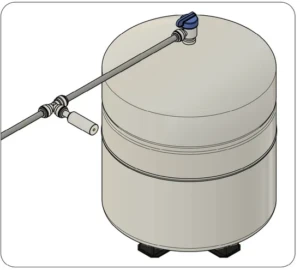 1. Place the tank in the desired location.
2. Attach the 3/8” elbow tank valve.
3. Connect the 3/8” natural tubing from the tank valve to the STATPURE tank port on the manifold.
NOTE: Position the water storage tank as near as possible to the STATPURE. The system and storage tank can be separated by up to 30 feet (9 meters), as they’re on the same level and there are no significant “dips” in tubing, which can create back pressure.
Tank Pre-Charge
The tank air bladder is factory pre-charged to 7 psi. Verify pressure (see section 12) before installation.
Injection Port Installation
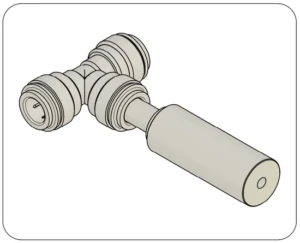
1. Cut the 3/8” natural tank line approximately 4–12 inches (10.2-30.5 cm) from the tank valve.
2. Install the Injection Port Assembly in the cut section.
3. Ensure the injection port remains accessible for maintenance and sanitization.
Filter Installation
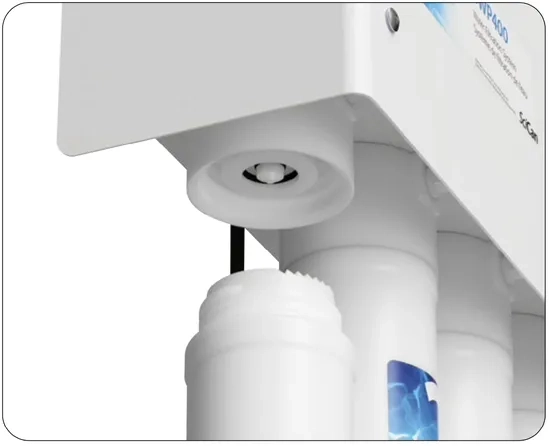
1. Reinstall all four filters into the system manifold (if they were removed during mounting).
2. To install, push the filter up into the manifold and turn clockwise. Make certain the filters are fully engaged to prevent any leaks.
3. For filter #2 Hyperfiltration, insert the black ¼” drain tubing and elbow into the bottom of the filter. Ensure it is fully inserted to prevent any leaks.
As always if you have any questions about this process or anything else please feel free to contact us and take advantage of our “FREE TECH SUPPORT.”
We also offer FREE VIRTUAL TECH SUPPORT to “See and Talk” with a “Real Time Live Technician” for any problems you may be in need of help with.
You can also use our “FREE MAINTENANCE PROGRAM”. Take the guesswork and worrying about what unit is due for maintenance and which maintenance cycle it is time for. We will keep track of all your autoclaves and let you know when it’s time for anything.
You can find more info on the SciCan StatPure on our website here.