Flight A6 Radius Package Maintenance Guide
Proper installation, operation and maintenance are the most important things to know in terms of ownership of any device or instrument. Believe it or not, that even extends to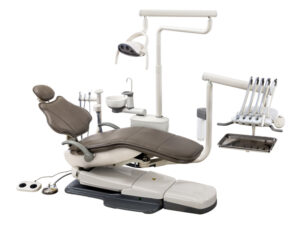 some of the biggest machines, like your dental operatory. Proper installation is vital to ensure that your machine starts its work without issue. Following proper operation will ensure that no complications arise during its use. And remembering proper maintenance can not only help your machines run smoothly… But it also helps to ensure longevity in your units. And when it comes to a dental operatory, a massive financial investment, you want to keep it in top shape.
But here at Sterilizer Autoclave Solutions, we make it our job to provide you with the proper knowledge to make sure everything goes smoothly for every phase of the process. We’ve written about the Flight Dental Systems A6 Radius Package. You can find the original article on our site here. But in this article, we’d like to focus on the proper instructions for installation with this dental operatory. We’ll be going over the maintenance instructions for the A6 Radius Package Operatory with instructions provided by the manufacturer. WIth proper maintenance, you can ensure your operatory system’s longevity and keep it running smoothly.
If you have any questions about the Flight Dental Systems A6 Radius Package, or anything else, please give us a call at 704-966-1650 Option 3 for our Free Tech Support line.
General Overview
• Shut off all electrical sources, water and air after operation of the dental unit is finished or when servicing the unit.
• Do not run the chair motors continuously.
• The air and water filters must be rinsed each month.
• Ejectors must be rinsed after every use.
• Do not turn on the light when the unit is off to protect the light.
Filters and Checking for clogs
Before entering the regulators, air and water must pass through separate filters. However, when a filter becomes sufficiently clogged, it must be replaced to prevent restricted flow to the regulator.
Air Filter Clog
If an air clog is suspected, first flip the master on/off toggle to the ON position and remove the floor box cover.
Watch the air pressure gauge in the floor box while pressing the air syringe button. As mentioned previously, if the gauge shows a pressure drop of more than 15 psi, there is a clog and the filter needs replacement.
Water Filter Clog
A water filter clog might be present if there is poor water flow from the syringe.
To inspect, place the master on/off toggle to the OFF position and close the manual shutoff valves.
Purge the system of air and water pressure by operating the syringe buttons until the air and water cease to flow.
Use a standard flat blade screwdriver to remove the filter housing from the air and/or water regulator assemblies.
Remove the filter.
The filter will need replacement if it appears clogged or discoloured.
Install the filter with the beveled edge facing the manifold. (The system will not operate and function properly if the filter is incorrectly installed.)
System Air and Water Pressure Adjustments
The air and water pre-regulators are located in the floor box. Verify the air compressor is on and that it maintains a pressure of 80-100 psi inside the tank prior to any adjustments.
The air pressure gauge in the floor box does not change until the pressure from the system is released when the system air or water pressure is decreased. Activate the syringe for a few seconds before checking the gauge. Repeat the process each time an adjustment is made to decrease air pressure.
Protocol for adjusting the air and water pressure:
- Turn the manual shutoff valves counter-clockwise to fully open.
- Turn the system ON and check the pressure gauge in the floor box. The pressure should be 70-80 psi.
- Operate the syringe while watching the gauge. There may be a clogged filter if the air pressure drops more than 15 psi.
To adjust the air, or water pressure, turn the corresponding pre-regulator (water or air) knob clockwise to increase the pressure and counter-clockwise to decrease. Only do this if necessary, although adjustment of the air pressure is not recommended unless with professional help.
Gravity Drain, Air Vent and Vacuum Outlet
The gravity drain tubing is connected to the office waste drainage system. It provides for the disposal of water and debris from the dental unit.
The air vent prevents the trapping of air in the office waste drainage system. The vent will become obstructed if the waste water and debris is backed up into the unit.
The office central vacuum outlet should be located in the floor box. It is connected to the vacuum/suction instruments by a flexible tube.
Replacement of Vacuum Trap Filter
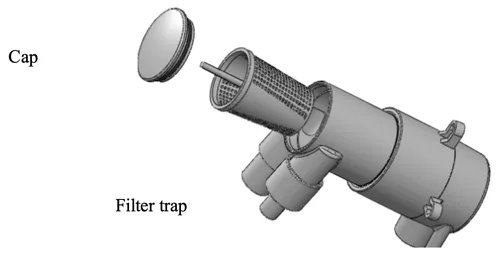
It is recommended that gloves and a face mask be worn when performing this procedure to avoid contact with biological contaminants. The vacuum canister is located behind the chair. To replace the vacuum trap you must first turn off the central suction unit. The cap of the canister is removed by lifting it off. The vacuum trap can then be lifted from the canister and disposed of by way of your regular medical waste disposal method. Replacement traps may be purchased from your local authorized Flight Dental System’s dealer. The filter traps are specialized for Flight Dental System’s chair configuration.
Cleaning and Upholstery Care
Flight Dental Systems will not attempt to specify the required intervals or protocols for disinfection nor can it recommend the overall best surface disinfectant. Please refer to the Infection Control
Recommendations published by the American Dental Association and to the Centre for Disease Control for further information.
Caring for Chair and Stool Upholsteries
As with all cleaning products, first clean a small inconspicuous area to ensure the material will not discolor or fade. It is recommended that each stain be cleaned in a stepwise manner using the sequence below:
Ultra Soft Upholstery
Clean spots with mild soap and water or an ordinary household cleaner such as Fantastic or 409 cleaners.
Wipe off any soap residue with a clean damp cloth.
Allow to air dry or dry quickly with a warm setting of a hair dryer.
For stubborn stains use a mild solvent.
Dry cleanable by conventional methods using commercial dry cleaning solvent.
Other Tips
- Always apply cleaners with a soft white cloth. Avoid the use of paper towels.
- When using strong cleaning solutions such as alcohol, it is advisable to first test in an inconspicuous area.
- Never use harsh solvents or cleaners that are intended for industrial use.
- To restore luster, a light coat of spray furniture wax may be used.
- Apply to chair; let it set for 30 seconds. Lightly buff dry with a clean, dry cloth.
Barrier Technique
Flight Dental Systems strongly advocates the barrier technique be used whenever possible to preserve the finish and appearance of the equipment. Wherever possible disposable barriers should be used and changed between patients. The barrier technique will ensure maximum long-term durability of the surfaces and finishes of the equipment. Barriers may be purchased from your local dental supply dealers that will cover the unit touch pads, light switch and handles, air-water syringes, treatment tray handle and the chair including headrest. These barriers should be removed and replaced after every patient.
In barrier compromised or inapplicable touch and transfer surfaces, the area must be properly cleansed, chemically disinfected and sterilized.
Chemical Disinfection
Regardless of the chemical disinfectant used, it is imperative that the equipment be thoroughly washed with mild soap and warm water at least once per day. This wash down will minimize the harmful effects of chemical disinfection residues being allowed to accumulate on the equipment.
When using chemical disinfectants, always pay strict attention to the manufacturer’s disinfectant directions. When using concentrated disinfectants, measure the concentrate carefully and mix according to package directions. Disinfectant solutions that are relatively harmless to surfaces at their recommended strengths can be corrosive at lower than recommended dilution ratios.
Unacceptable Disinfectants
These disinfectants will harm the surface finishes of dental equipment and are not recommended.
Use of these products will void your warranty.
- Strong Phenols / Phenol-Alcohol combinations – examples – Lysol, Lysol 2, Lysol Professional, Coe
- Foam, Coe Spray, Vitaphene, Omni II
- Sodium Hypochlorite / Household Bleach – examples – Clorox, Ajax, Purex
- Strong Alcohol based solutions – exceeding 19% alcohol by content
- Household Cleaners
Conditionally Acceptable Disinfectants*
The following disinfectants have been found to be the least harmful to the equipment surfaces by our test methods. Harmful effects of chemical disinfectant residues being allowed to accumulate on the equipment
- Idophors** – examples – Biocide, Aseptic-IDC, Wescodyne, Promedyne, Ido-Five
- Glutaraldehyde – examples – Sterall Spray, Coldspor
- Synergized Super Quat – Dis-cide, Cavicide, Kleenaseptic
- Low Content Alcohol – BioText
*The Manufacturer makes no representation as to the disinfectant efficacy of these products. We make no warranty expressed or implied that these disinfectants will not damage the surface finishes. Damage and discoloration of the surface finishes are not covered under the warranty.
**Iodophor-based disinfectants will cause yellow staining on many surfaces. Regular washing with soap and water will minimize this staining. Iodophor neutralizers such as Promedyne are also available.
Flushing Handpiece Tubing
Flushing the handpiece tubing is important for removing stale water and possibly contaminated water.
The tubing flushes more water through the tubings than when operating the foot control only. The handpieces need to be disconnected to properly flush the tubing.
The tubes can either be flushed independently or grouped together. Gather the tubings that use water coolant to be flushed and hold over a sink, cuspidor bowl or basin. Ensure that the tubings are held so that the water will be directed into the receptacle.
Locate the switch on the side of the control head and flip it to the on position for the required time.
Return the toggle to off when finished and replace the tubings.
All waterlines should be purged at the beginning of each work day by flushing them thoroughly with water for at least 2 to 3 minutes. Before purging is carried out, handpieces, air/water syringes and ultrasonic scalers should be removed from the waterlines. Any attachments with a water source (including handpieces, air/water syringes, ultrasonic/piezo scalers, endo handpieces, and implant devices) should be run for 20 to 30 seconds after patient care in order to purge all potentially contaminated air and water. The attachment should then be removed and, following cleaning and disinfection of clinical contact surfaces, another sterilized attachment is to be used with the next patient. Always follow manufacturer’s instructions for use. Complete dental unit waterline care requires not only continuous waterline maintenance, but also shock treatments and monitoring. Be careful not to touch the tubing with fingers or soiled gloved hands when changing the water coolant bottle, as this can easily contaminate the entire system. Educate and train sta on managing dental water quality.
Handpiece tubing’s should be flushed and cleaned using a specialized waterline disinfectant solution (ex.E20 Germiphene). E20 from Germiphene is approved for use in Canada and the USA. They recommend a shock treatment before initial use and then to maintain water treatment put the recommended dosage each day in the water bottle. The solution may be introduced to the system using the unit’s closed water system. Be sure to follow the disinfectant solution’s manufacturer’s directions for use.
Cleaning Vacuum Lines
Ensure that vacuum lines are cleaned regularly using a suitable Evacuation System Cleaner like MicroVac or similar product that is appropriate for your vacuum system. Some evacuation cleaners can foam and can cause damage to the vacuum, make sure to read instructions and guidelines before using a specific cleaner. Follow the manufactures instructions for cleaning of the evacuation lines. Recommended to be done weekly.
As always if you have any questions about this process or anything else please feel free to contact us and take advantage of our “FREE TECH SUPPORT.”
We also offer FREE VIRTUAL TECH SUPPORT to “See and Talk” with a “Real Time Live Technician” for any problems you may be in need of help with.
You can also use our “FREE MAINTENANCE PROGRAM”. Take the guesswork and worrying about what unit is due for maintenance and which maintenance cycle it is time for. We will keep track of all your autoclaves and let you know when it’s time for anything.