

Tuttnauer T-Edge Control Panel Review Leave a comment
Our Tuttnauer T-Edge Control Panel Review is a quick guide to follow up on our Intro to the Tuttnauer T-Edge, and Tuttnauer T-Edge Operating Instructions blogs. In this article we will cover the home screen description, door and cycle operations, as well as water levels and draining the reservoirs. And if you just want to talk to someone, call our Free Tech Support at 704-966-1650 Option 3.
Control Panel
The display is a graphic Touch screen LCD panel used to display the autoclave current status, any Operational or Error Messages, and for operating the machine.
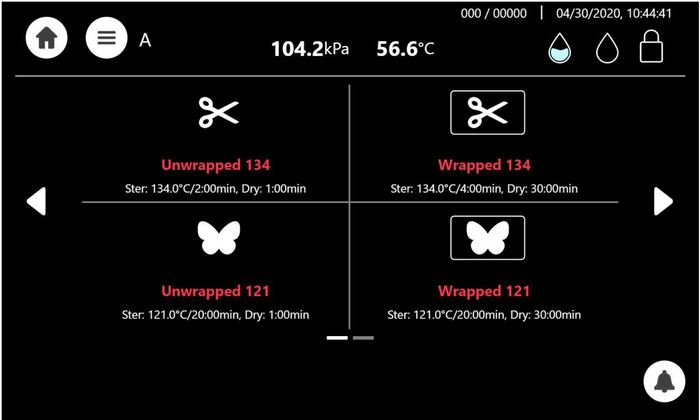
Home Screen – Program Select Screen
This screen will be presented when the autoclave is switched on:
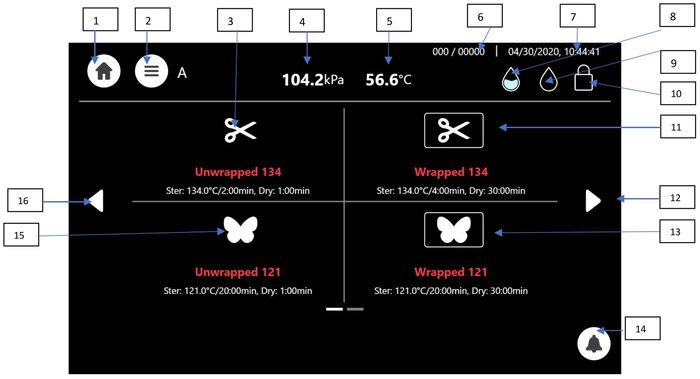
| # | Icon | Name | Description |
|---|---|---|---|
| 1 | Home Icon | Immediate Use Only | |
| 2 | Menu | Menu Selection Icon | |
| 3 | Unwrapped 134 | Exposed Unwrapped load program | |
| 4 | Pressure | Momentary Pressure in the chamber | |
| 5 | Temperature | Momentary Temperature in the chamber | |
| 6 | Load No. ID | Load Cycle Number | |
| 7 | Date and Time | It enables the operator to set the machine date and time screen | |
| 8 | Water Full | The Waqter is full in the demineralized water reservoir | |
| 9 | Waste Water | The Water is empty in the waste reservoir | |
| 10 | Door Condition | Door is locked | |
| 11 | Unwrapped 134 | Unwrapped 134 sterilization program | |
| 12 | Side Arrow Right | Paging forward to the next program will display the next screan item 16, 17, and 18. | |
| 13 | Wrapped 121 | Wrapped 121 Load Program | |
| 14 | Warnings | It indicates the Alerts | |
| 15 | Unwrapped 121 | Unwrapped 121 Load Program | |
| 16 | Side Arrow Left | Paging backward to the previous programs |
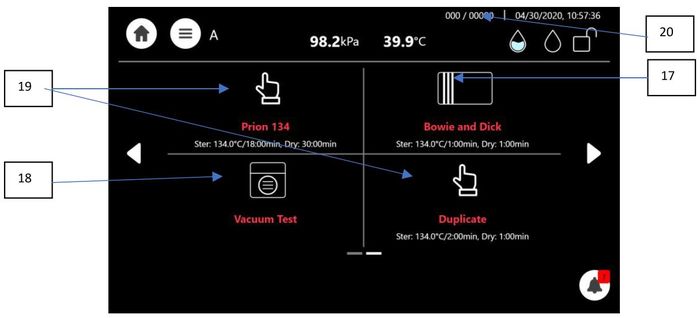
Please Note: Prion Program requires the demineralized water level in the reservoir to be filled to the in maximum level in order to start the program, otherwise an alert will be prompted “please fill water tank to full for start“.
| # | Icon | Name | Description |
|---|---|---|---|
| 17 | Bowie and Dick Test | Periodic testing as referred to in ISO 17665-1 | |
| 18 | Vacuum Test | See the screen above | |
| 19 | Prion | See the screen above | |
| 20 | Sufficient water level for all sterilization programs except "Prion". | There is sufficient water level in the demineralized water reservoir in order to run all steriliaztion programs except "Prion" |
Opening the T-Edge Door
The machine is equipped with an electronic door lock. The door is locked when either the system is running a sterilization cycle, there is pressure in the chamber, or the power is off.
If you need to open the door after a cycle completes, press the confirm button:
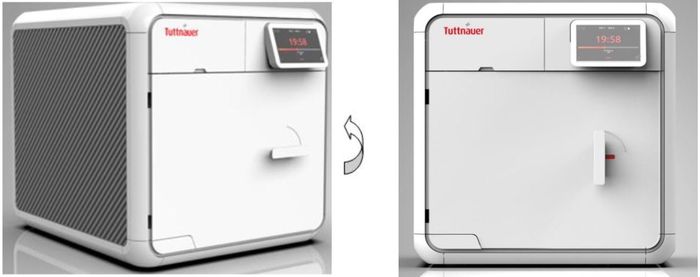
In any case if the door is not locked, it can be opened as illustrated below. Turn the handle counterclockwise and pull open the door.
Starting a Cycle with the T-Edge
It is recommended to perform a B&D (Bowie and Dick) test cycle at the beginning of each working day.
1. Before each cycle, check visually that the gasket is intact, not loose, and clean.
2. Load the autoclave properly
3. Choose the appropriate sterilization program. Note: The program can only be selected when the door is open.
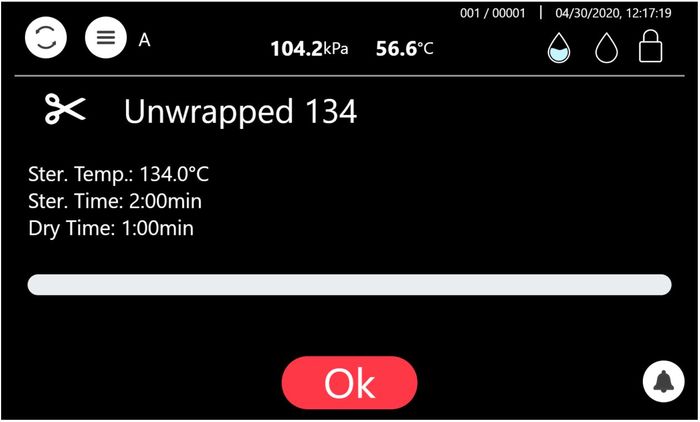
4. The selected program will be highlighted in red as depicted here:
5. The next screen will prompt the selected program information.
6. Close the door by both: 1- Pushing the door gently – and – 2- Turning the handle clockwise while pushing the door until it comes to the closed position, then releasing the handle.
When the door is closed, the open-door symbol… ![]() is replaced with the closed-door symbol.
is replaced with the closed-door symbol. ![]()
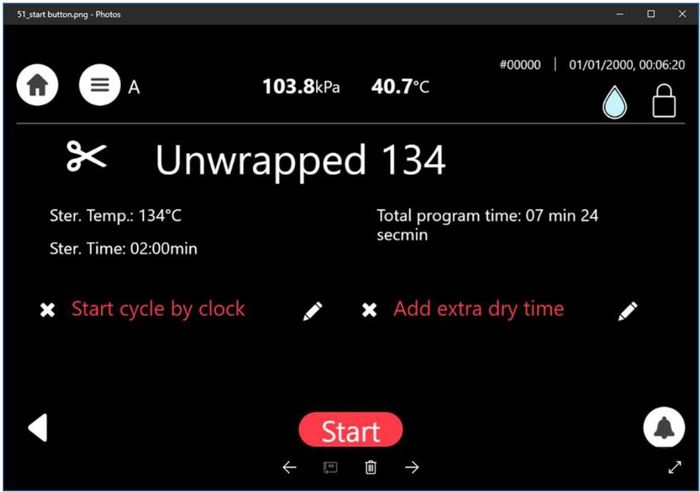
Press the Start Button to start the Cycle. 
 Do Not remove the top plastic cover during a running cycle. Hot water / Steam may exit!
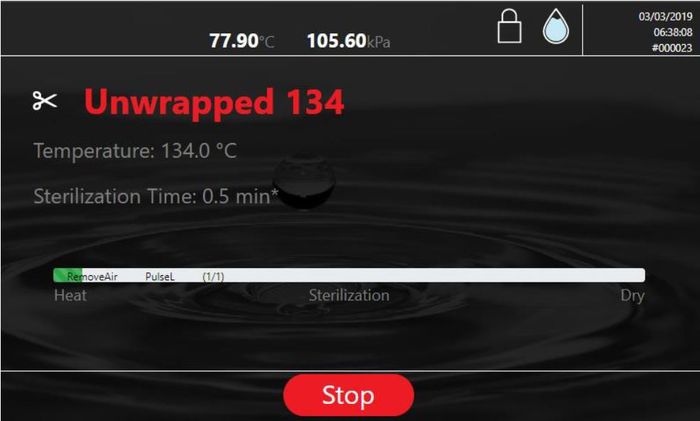
After pressing Start the sterilization process starts.
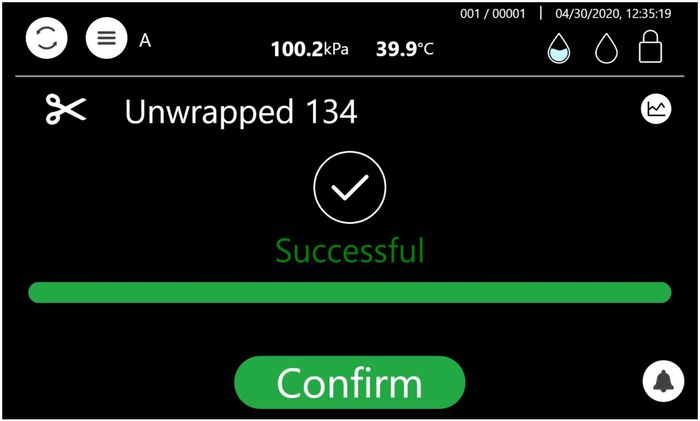
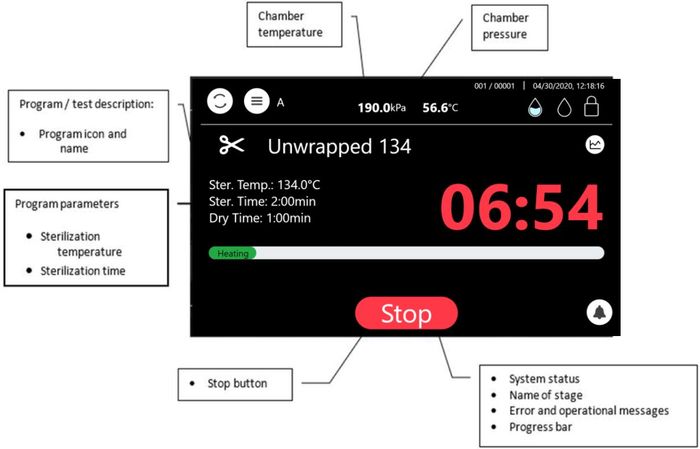
This shows the screen display while an “Unwrapped 134” Sterilization program is in progress.
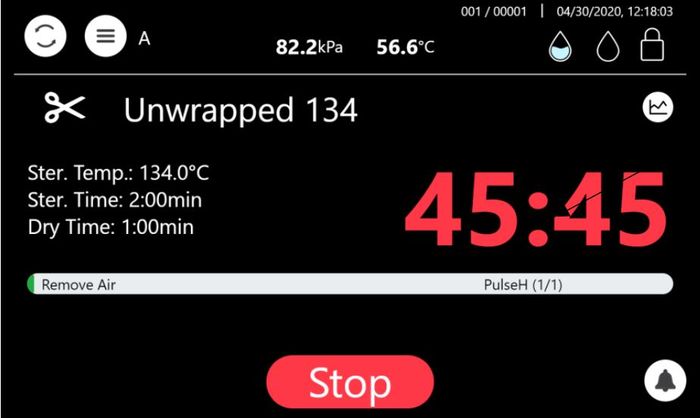
Here is an explanation of the information displayed on the cycle information screen.
Available Sterilization Programs and Test Programs
List of available Sterilization and Test Programs
| # | Icon | Name | Temp | Sterilization Time (minutes) | Dry Time (minutes) | Load Type | Type of Use | Cycle Type |
|---|---|---|---|---|---|---|---|---|
| 1 | Unwrapped 134 | 134°C | 3 | 1 (default) Range: 1-99 | Unwrapped Instruments (Unwrapped Solid) | Immediate Use Only | S | |
| 2 | Wrapped 134³ʾ⁴ | 134°C | 4 | 23 (default) Range: 30-99 | Handpieces, Wrapped Instruments (wrapped solid), Textile (fabric packs), porous | For Storage | B | |
| 3 | Unwrapped 121 | 121°C | 15 | 1 (default) Range: 1-99 | Unwrapped Instruments (Unwrapped Solid) | Immediate Use Only | S | |
| 4 | Unwrapped 121³ | 121°C | 20 | 35 (default) Range: 30-99 | Wrapped Instrument (wrapped solid), Textile (fabric packs), porous | For Storage | B | |
| 5 | Prion¹ʼ² | 134°C | 18 | 30 (default) Range: 30-99 | Solid Load / Porous Load | For Storage | B | |
| 6 | Bowie and Dick | 134°C | 3.5 | 2 (default) Range: 0-99 | Chemical Indicator in a product challenge device | Periodic testing as referred to in ISO 17665-1 | B | |
| 7 | Vacuum Test | N/A | Vac. Stable Time 1 = 5 min. Vac. Stable Time 2 = 10 min. | Empty | Not Applicable | N/A | ||
Notes:
¹Prion program requires the demineralized water level in the reservoir to be filled to the in maximum level order to start the program, otherwise an alert will be prompted “please fill water tank to full for start”.
²For more information on Prion program, see “Information on Prion Sterilization Program” below.
³The sterilization program can be used for sterilizing lumen device of no longer than 230mm/9in and no smaller than 3.4mm/0.133in.
⁴This sterilization program can be used in sterilizing up t five dental handpieces.
Maximum Load Weight per Load Type
| Load Type | Maximum Load Weight | Suitable for Programs |
|---|---|---|
| Textile, Porous | 1.5kg / 3.3lbs | Wrapped/Prion |
| Solid Unwrapped | 6.0kg / 13.2lbs | Unwrapped |
| Solid Unwrapped | 3.5kg / 7.7lbs | Wrapped/Prion |
| Prion 134 | 3.6kg / 7.9lbs | 3.6kg/7.9lbs of solid load / 1.5kg/3.3lbs porous load |
Description of the Sterilization Cycle Stages
- Air-removal stage: Pre-vacuum pulses are performed. For wrapped cycles. there are 3 pulses and the vacuum is deeper.
- Heating stage: Steam is inserted into the chamber until the sterilization temperature is reached.
- Sterilization stage: Sterilization temperature is maintained constant during the sterilization time.
- Fast exhaust stage: Steam is exhausted out of the chamber at a fast rate until pressure decreases to ambient pressure.
- Drying stage: Performed with the door closed by pulling vacuum and using the accumulated heat in the chamber and the load to remove leftover moisture from the instruments and wraps.
Description of the Vacuum Test Stages
Vacuum is produced in the chamber, down to P1=15 kPa. At this stage all the valves close. The autoclave remains in this stage for 5 minutes. This period enables the condition in the chamber to reach equilibrium. After the 5 minutes have elapsed, the cycle “history record” records the pressure that is referred to as P2. At this point the test begins and lasts 10 minutes. At the end of the test, the cycle “history record” records the results. The pressure at the end of the test is referred to as P3.
Notes: During the test period the autoclave is not heated. Even if the vacuum test is cmpleted, the operator shall check the test results and consider whether the test results are acceptable or not.
Description of Bowie-Dick Test Stages
- Air-removal stage: Vacuum pulses are performed.
- Sterilization stage: Temperature and pressure are maintained constant at the pre-set level for sterilization time.
- Fast exhaust stage: Steam is exhausted out of the chamber at a fast rate until pressure decreases to ambient pressure.
- Drying stage: Heating of chamber followed by a vacuum break (air inlet) to remove leftover moisture from the instruments and wraps. Air inlet to reach atmospheric pressure.
Information on Prion Sterilization Program
In some European countries*, there is a national regulation that requires to include a Prion cycle on a class B autoclave as part of a general prion decontamination program.
Prions are abnormally altered proteins associated with the risk of infection with Creutzfeldt-Jakob disease and other encephalopathies.
For the Prion cycle, only the physical sterilization parameters were validated (i.e. sterilization holding time, sterilization temperature) as the national regulations require this validation only. There is no regulatory requirement to validate the sterilization effect on the Prion protein such as elimination or deactivation.
In accordance with the regulations, the sterilization temperature is 134°C and the sterilization holding time is 18 minutes.
*see for example:
- French regulation: “Informations et recommandations relatives aux petits sterilisateurs a la vapeur d’eau” published 27.12.2005
- Swiss regulation: “Verordnung über die Prävention der Creutzfeldt-Jakob-Krankheit bei chirurgischen und medizinischen Eingriffen (CJKV)” published 20.11.2002
Cycle Succeeded / Cycle Failed Notifications and Follow-on
Cycle Succeeded
When the cycle has ended successfully, the following “Successful” message is displayed:
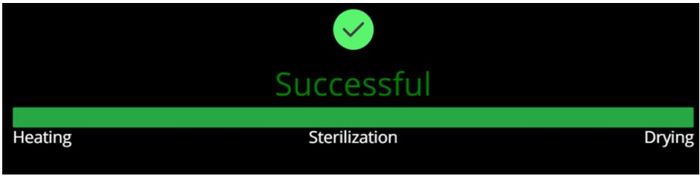
Press the confirm button to confirm the “Successful” message.
Proceed to “opening the door and Unloading” below.
Cycle Failed
In the event of a failure at any stage, the exhaust valve will be opened to release pressure from the chamber, the message “Fail” and a relevant failure message will be displayed on the screen:

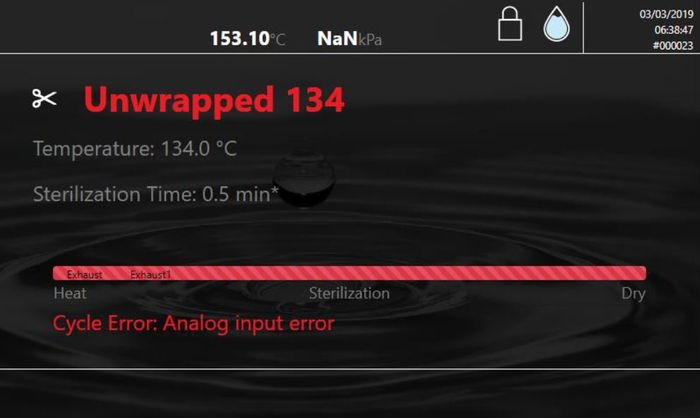
The load has not completed a sterilization cycle; therefore, it is not sterile. Handle it as a contaminated load.
ANY FAILURE MEANS THAT THE LOAD IS NOT STERILE
Aborting a Cycle
It is possible to stop the cycle while the autoclave is operating.
Press the Stop button at any stage (except exhaust) of the process to stop the operation.
If the cycle is aborted, the LOAD IS NOT STERILE. A “fail” message will be displayed with an error message explaining the reason for the failure. An alternating busser signal will sound to notify the user.
Press the Confirm button to confirm the displayed message.
The load has not completed a sterilization cycle; therefore, it is not sterile. Handle it as a contaminated load.
Opening the Door and Unloading
1. Push the Confirm button to confirm the “Successful” or the “Error” message to unlock the door.
2. Open the door.
 Open the door a little to release the steam from the chamber. Only after the steam escaped should you open the door widely.
To avoid severe injuries from hot steam and condensed hot water that may drip out when opening the door, it is strictly forbidden to lean on the autoclave. It is strictly forbidden to place your hand or any part of your body over or under the door.
3. Use the tray handle or wear heat-resistant gloves to remove the load from the autoclave.
4. After unloading, visually inspect the load to ascertain that it is dry and that sterilization indicators have made the required color change.
Water droplets and visible signs of moisture on sterile packaging of the tape used to secure it may compromise the sterility of processed loads or be indicative of a sterilization process failure. Visually check outside wrapper for dryness. If there are water droplets or visible moisture on the exterior of the package or on the tape used to secure it, the pack or instrument tray is considered unacceptable.
The sterility of the instruments processed in unwrapped cycles cannot be maintained if exposed to a non-sterile environment.
Checking Waste Water Level
When the waste-water level is high, the general alarm symbol will appear.![]() A relevant text alarm will appear in the alarms list. This situation is normal, but the operator cannot run a new cycle before draining the waste-water reservoir.
A relevant text alarm will appear in the alarms list. This situation is normal, but the operator cannot run a new cycle before draining the waste-water reservoir.
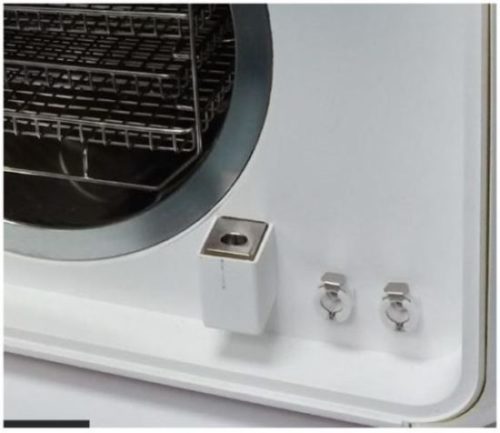
Draining the Reservoirs
This procedure applies to the mineral-free water reservoir (left) and to the waste-water reservoir (on the right).
Note:  The Improper Water level icon appears when the reservoir needs to be filled or drained.
The drain valves are located on the front right side of the autoclave after the door is opened.
To drain the reservoir:
1. See item (5) with the plastic hose (6) attached to it (supplied with the autoclave).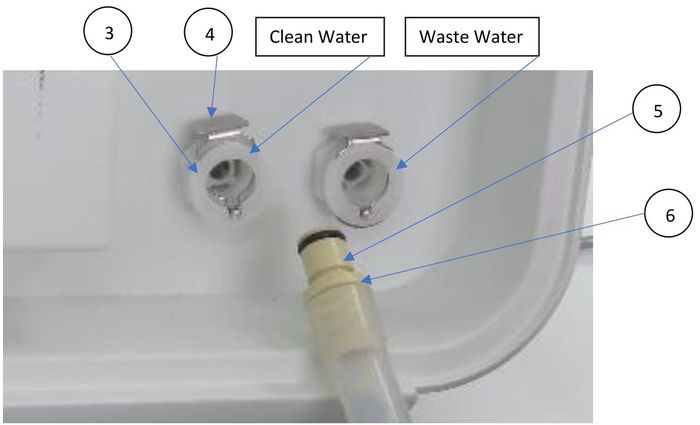
2. Put the other end of the hose into a bucket.
3. Insert part (5) into valve (3) and press it until you hear a click. The drain valve opens immediately.
4. When the water reservoir is empty, press part (4). Item (5) will pop out approximately 3mm / 0.1in and the drain valve will be closed. Remove item (6) with the plastic tube.
Never reuse waste water.
5. If the drained reservoir is the clean-water reservoir fill erservoir t=with distilled water until it reaches the full level. (Approximately 6.5liters / 1.7 gallons)
The Tuttnauer T-Edge B-Class Steam Sterilizer is now READY FOR USE!
For more information on the operation of the Tuttnauer T-Edge see our other blog posts to include:
An Intro to the Tuttnauer T-Edge Steam Sterilizer
Tuttnauer T-Edge Operating Instructions
To see the Tuttnauer T-Edge you can visit the following:
You can see the Tuttnauer T-Edge 10B 220v 10″X18″ Chamber OEM T-EDGE10B here
You can see the Tuttnauer T-Edge 10B 220v 10″X18″ Chamber OEM T-EDGE10S here
*All information for Tuttnauer T-Edge operating instructions was taken from Tuttnauer Operation and Maintenance Manual – Pre-vacuum B-class Steam Sterilizer T-Edge – Man205-0502001EN rev G – May 2020
As always if you have any questions about this process or anything else please feel free to contact us and take advantage of our “FREE TECH SUPPORT.”
We also offer FREE VIRTUAL TECH SUPPORT to “See and Talk” with a “Real Time Live Technician” for any problems you may be in need of help with.
You can also use our “FREE MAINTENANCE PROGRAM”. Take the guesswork and worrying about what unit is due for maintenance and which maintenance cycle it is time for. We will keep track of all your autoclaves and let you know when it’s time for anything.