
CPAC RH-Pro9 Installation Guide
Here at Sterilizer Autoclave Solutions, we always continue to highlight the core elements of the ownership process: installation, operation and maintenance. Which is why we have a large library of resources and guides for anyone to access to help them through these processes.
In this article, we’d like to focus on a guide for one autoclave in particular. A High-Velocity Hot Air sterilizer from CPAC, their RH-Pro9. HVHA sterilizers are much different than your typical steam sterilization, and because of that, they sometimes fall to the wayside. But the RH-Pro9 helped CPAC to bring the HVHA into the modern autoclave market. Here, we’re going to look at the installation guide for the CPAC RH-Pro9, to ensure a proper install process of your sterilizer, with this guide’s instructions coming directly from the manufacturer.
If you have any questions about the CPAC RH-Pro9, autoclaves or anything else, give us a call at 704-966-1650 Option 3 for our Free Tech Support Line. Our technicians will help you with any questions you have about your ultrasonic cleaners.
Components and Control Functions
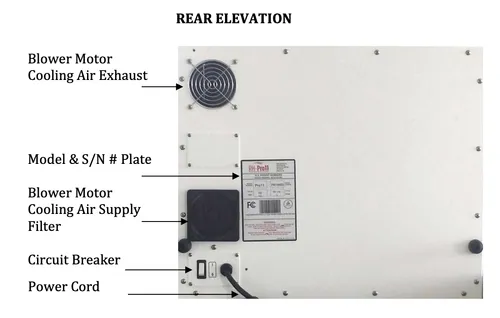
Front Elevation
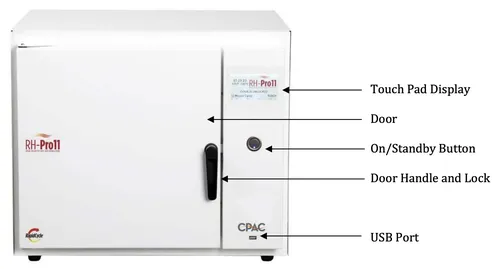
Rear Elevation
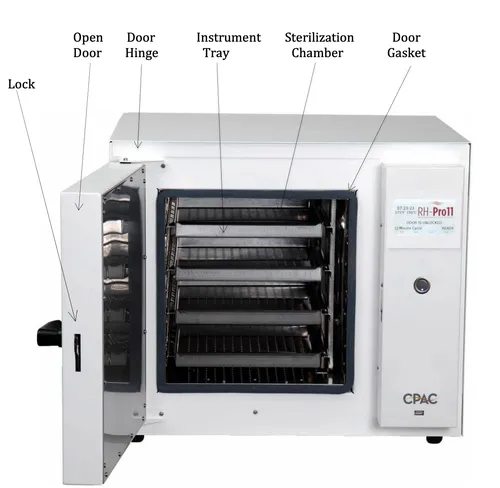
Front Elevation – Open Door With Instrument Trays
 INSTALLATION
Unpacking the Sterilizer
DO NOT CUT THE BOX OPEN OR AWAY FROM THE STERILIZER!
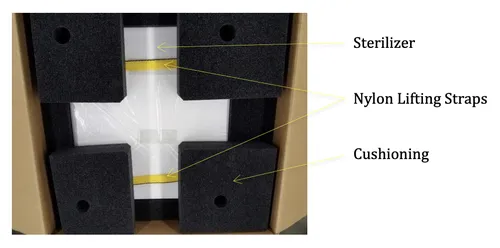
The RH-Pro11 and RH-Pro9 weighs approximately 90 pounds (~41kg) and 70 pounds (~32kg), respectively, and with their dimensions, makes either unit difficult to lift by one person. To remove from the shipping carton, it is best to remove the top packing cushion and use the two nylon lifting slings (see picture below) encompassing the sterilizer to make lifting the unit easier. It is recommended that two individuals lift the unit. Once the unit has been removed from the carton, place the protective cushioning in the carton and store the shipping carton in a safe, dry location should the unit need to be returned for any repairs.
Location
The RH-Pro9/Pro11 is designed for operation indoors in a protected, relatively dust-free ambient temperature environment at a relative humidity of < 80% up to 88°F (31°C).
Surface Support – Level and of sufficient construction for weight of loaded sterilizer (approximately 100 pounds) and ancillary equipment.
Sterilizer Dimensions and Required Clearances
Outer dimension RH-Pro11: 22.5” (572mm)W x 25” (625mm)D x 19.5” (492mm)H. Outer dimension RH-Pro9: 19.63” (499mm)W x 20” (508mm)D x 13.75” (349mm)H.
Back of Unit to Back Wall: 4”(102mm)
Front Support Surface to Front Sterilizer: 1” (25mm)
Right Side of Unit to Side Wall: 4” (102mm) – See Note below
Left Side of the Unit to Side Wall: No clearance
Distance Above the Unit: 3” (75mm)
NOTE: The main power on/off circuit breaker is located at the right rear of the sterilizer. Install the sterilizer with enough clearance to permit reaching past the right side of the sterilizer to operate the switch. This is an infrequent need since there is a front-panel On/Standby button, but the rear panel circuit breaker should remain accessible. About 3.5-4.0 inches of side space is sufficient reachpast for most individuals. See APPENDIX II: RH-Pro9 and RH-Pro11 Cabinet Installation. The cooling air supply filter (pictured on page 10) requires occasional rinsing to remove accumulated dust. Installation should include consideration of access to that filter.
Electrical Requirements
ELECTRICAL WARNING!
For 115 VAC Models: Use 110-120 VAC, 60Hz alternating current only. For 230 VAC Models: Use 220-240 VAC, 50/60Hz alternating current only. Failure to do so may result in electrical shock or sterilizer damage.
115 VAC Unit: 110-120 VAC, 12 amp, 60Hz 1400 W warm-up 300 W operating
230 VAC Unit: 220-240 VAC, 6 amp, 50/60Hz 1400 W warm-up 300 W operating
NOTE: The unit must be connected to a properly polarized and grounded receptacle. Always use a power cord with grounding connections that match the receptacles in your location.
Cautions
WARNING! HVHA technology is radically different than steam sterilization and conventional practices associated with steam sterilization do not necessarily apply to HVHA technology. Read and employ all safety and operation instructions to maintain employee safety, required treatment efficacy, and equipment efficiency.
WARNING – FIRE OR EXPLOSION HAZARD! Do not use this sterilizer for sterilizing any liquid, volatile or solid chemical, or radioactive substance. Use this sterilizer only as specified in these user instructions. Ensure that all instruments are dry and free of any organic, chemical, or liquid residue before sterilizing.
WARNING – HOT SURFACES! The sterilizer’s interior, doorway, trays, and the sterilized instruments will be hot. Use heat-protective gloves when touching hot surfaces or objects.
As always if you have any questions about this process or anything else please feel free to contact us and take advantage of our “FREE TECH SUPPORT.”
We also offer FREE VIRTUAL TECH SUPPORT to “See and Talk” with a “Real Time Live Technician” for any problems you may be in need of help with.
You can also use our “FREE MAINTENANCE PROGRAM”. Take the guesswork and worrying about what unit is due for maintenance and which maintenance cycle it is time for. We will keep track of all your autoclaves and let you know when it’s time for anything.
If you want to read more info on the CPAC RH-Pro9, you can find it on our site here.