

Flight A12 Operatory Maintenance Guide
Proper installation, operation and maintenance are the most important things to know in terms of ownership of any device or instrument. Believe it or not, that even extends to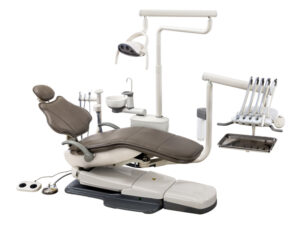 some of the biggest machines, like your dental operatory. Proper installation is vital to ensure that your machine starts its work without issue. Following proper operation will ensure that no complications arise during its use. And remembering proper maintenance can not only help your machines run smoothly… But it also helps to ensure longevity in your units. And when it comes to a dental operatory, a massive financial investment, you want to keep it in top shape.
But here at Sterilizer Autoclave Solutions, we make it our job to provide you with the proper knowledge to make sure everything goes smoothly for every phase of the process. We’ve written about the Flight Dental Systems A12 Operatory. You can find the original article on our site here. But in this article, we’d like to write about proper maintenance for your A12 operatory. With this maintenance guide, using instructions provided by the manufacturer. That way, you can ensure that every step of your maintenance process is performed correctly.
If you have any questions about the Flight Dental A12 Operatory, or anything else, please give us a call at 704-966-1650 Option 3 for our Free Tech Support line.
General Overview
A) Shut off all electrical sources, water and air after operation of the dental unit is finished or when servicing the unit.
B) Do not run the chair motors continually.
C) The air and water filters must be rinsed each month. Replace if it appears clogged or discolored.
D) Ejectors must be rinsed after every use.
E) Cuspidor must be rinsed after use.
F) Do not turn on the light when the unit is off to protect the light.
Filters and Checking for clogs
Before entering the regulators, air and water must pass through separate filters. However, when a filter becomes sufficiently clogged, it must be replaced to prevent restricted flow to the regulator.
Air Filter Clog
1. If an air clog is suspected, first turn the master On/Off toggle to the ON position and remove the floor box cover.
2. Watch the air pressure gauge in the floor box while pressing the air syringe button. As mentioned previously, if the gauge shows a pressure drop of more than 15 psi, there is a clog and the filter needs replacement.
Water Filter Clog
A water filter clog might be present if there is poor water flow from the cuspidor bowl rinse. To inspect, read the following instructions:
1. To inspect, place the master on/off toggle to the OFF position and close the manual shutoff valves.
2. Purge the system of air and water pressure by operating the syringe buttons until the air and water cease to flow.
3. Use a standard flat blade screwdriver to remove the filter housing from the air and/or water regulator assemblies.
4. Remove the filter.
5. The filter will need replacement if it appears clogged or discoloured.
6. Install the filter with the beveled edge facing the manifold. (The system will not operate and function properly if the filter is incorrectly installed.)
System Air and Water Pressure Adjustments
The air and water pre-regulators are located in the floor box. Verify the air compressor is on and that it maintains a pressure of 80-100 psi inside the tank prior to any adjustments. If it does not, see the troubleshooting guide.
The air pressure gauge in the floor box does not change until the pressure from the system is released when the system air or water pressure is decreased. Activate the syringe for a few seconds before checking the gauge. Repeat the process each time an adjustment is made to decrease air pressure.
Protocol for adjusting the air and water pressure:
1. Turn the manual shutoff valves counter-clockwise to fully open.
2. Turn the system ON and check the pressure gauge in the floor box. The pressure should be 70-80 psi.
3. Operate the syringe while watching the gauge. There may be a clogged filter if the air pressure drops more than 15 psi.
4. To adjust the air or water pressure, turn the corresponding pre-regulator (water or air) knob clockwise to increase the pressure and counter-clockwise to decrease. Only do this if necessary, although adjustment of the air pressure is not recommended unless with professional help.
Gravity Drain, Air Vent and Vacuum Outlet
The gravity drain tubing is connected to the office waste drainage system. disposal of water and debris from the dental unit. It provides for the
The gravity drain is connected to the cuspidor via a flexible tube.
The air vent prevents the trapping of air in the office waste drainage system. The vent will become obstructed if the waste water and debris is backed up into the unit.
Replacement of Vacuum Trap Filter
It is recommended that gloves and a face mask be worn when performing this procedure to avoid contact with biological materials. The vacuum canister is located within the utility center. To replace the vacuum trap you must first turn off the central dental suction unit. The cap of the canister is removed by turning and lifting it. The vacuum trap can then be lifted from the canister and disposed of by way of your regular medical waste disposal method. Replacement traps may be purchased from your local dental dealer. The traps are a standard 2-hole configuration in 1 7/8 inch sizing.
As always if you have any questions about this process or anything else please feel free to contact us and take advantage of our “FREE TECH SUPPORT.”
We also offer FREE VIRTUAL TECH SUPPORT to “See and Talk” with a “Real Time Live Technician” for any problems you may be in need of help with.
You can also use our “FREE MAINTENANCE PROGRAM”. Take the guesswork and worrying about what unit is due for maintenance and which maintenance cycle it is time for. We will keep track of all your autoclaves and let you know when it’s time for anything.